Continuing to make some gingerbread – in micro or 1:144 scale. This time it was a gift shop from True2scale.
Since this is my 10th kit to assemble I am going to only highlight my mistakes. If interested in more on the assembly of parts not covered they are likely found on one of the other nine. They are found here Gingerbread Book Village.
Window placement
When adding the interior window frames, it is important to line them up with the opening on the wall. The way to do this is by looking at it from the other side while glue is still wet. It is not as noticeable once the outer window frame was added, but it was still not centered.

First floor walls
The mistake is mine because the instructions have a clear picture. My mistake was not looking at the provided picture to get the orientation of the floor. I glued the floor in with the cutout to the back. Here is a picture that might have helped me.

Adding lights
For the lights I use Nano size LEDs I get from Evan’s Designs. For the first floor, I added a faux ceiling under the floor. I punch a hole in the paper for the light. I grooved the underside of the floor for the wires. I didn’t need to add the groove but it is nicer this way. I also added a notch and a groove to the support wall.


For the second floor, over the smaller first floor, I added a light inside the peak at the gable. To hide the wires, I made a small notch at the gable connection to the front roof. This notch was so the wires had a hole to come out. Although the way the peak fit, the small notch may have not been needed. The wires then come down the valley, then tuck under the roof, and down the outside. The side it went down also had a groove I added, trimming away part of the layers of either notches or the side.

I also added a third light in the vaulted ceiling area. A notch was added to the back roof and the wires ran from the notch to the side along the top. I added a groove (not pictured) to the roof triangle but it wasn’t necessary. Those roof triangles were helpful to get the leds to hang properly. It has been a bigger challenge bending the wires just right in the others.

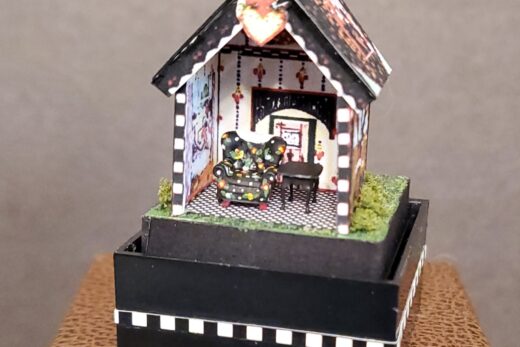
The below shows how the grooves I add and the wiring are mostly covered by the white trim. I will deal with it later where there are gaps.

This is why I choose to add lighting – to fill the darker areas.

Covering gaps in the white trim
I use the leftover white motherboard to cut pieces to fit in any gaps between pieces. They don’t need to be perfect because white paint and the glitter help cover as well. The below is the gable, but the front and back roofs had a large gap that needed to be covered as well as some corners.

Furniture
I was just going to show mistakes and lights, but the furniture is so darn cute I can’t resist showing it.
Tables and Presents
I turn them upside down to try to apply the paper evenly to table top edge. I don’t like the presents, but I did use them. I have no great suggestion on how to make them better.


The other table I couldn’t decide at first which direction the pieces go. But really they would work either way, but this is what I did. The top went on top of the bigger portion to the left.

Shelves
I just love both the angled shelves and the hutch. I think the way they are made is quite clever adding the paper to the back of the shape.


Trees
I shaped a tree on the chenille stem and then decided it wasn’t tall enough. I switched to the other end and made a second tree. After removing it and added a shallow and small (4mm) bead cap, I determined it was too tall to go on the table.

My third tree is then measured better to decide how tall to make it for the second story table. It turns out a tiny bit taller, but I am willing to use it. I added garland from gold thread. Then I added the red beads. That looks pretty good, but I like it with the yellow/gold ones better.

I measure again for the tree needed in the first floor and turns out I can use the first shaped tree. I finish it and add it to the table.
I am honestly amazed how well these trees look using the chenille stems.
Bowls
Instead of the paper bowls I used some 3D round and oval nail art studs that I have. These are 2 or 3mm round and 4mm oval shape. This ruler looks really large so compare to a real life ruler.

They look so good with the beads in them.

Window boxes
I almost forgot these. They look really good. Bits of greenery from the chenille stems, add the beads, add white paint on the green and the beads, then I added a touch more white paint to the window boxes where they might have snow to land.

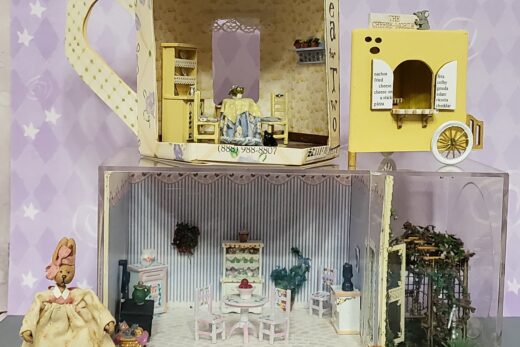
Finished
This is the front after putting on my temporary board. I love the perspective of looking in between them.

The inside looks delightful. I would totally shop here.


To see all the others – they are found here Gingerbread Book Village.
Comments are welcome.
Happy miniaturing!
Preble
If you enjoy my website, please consider making a small donation via PayPal.me/minismallpackages. Thank you!

These look so sweet with the lights! I love how the interiors come to life with them! Great idea, but I’m not doing another set !