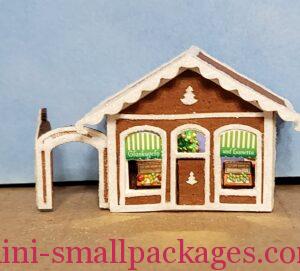
The Sweet Rose was an AI designed cottage that the Quarter Connection membership voted to have as a project. Debbie Young offered this project. I was on the fence about buying yet another kit to sit on my shelves undone, yet I gave in and ordered it anyway.
One reason I did so was how delightful Debbie made the interior which is all her design. Another is that we would be having weekly class meetings on zoom. This latter is maybe what will get it moved along.
Floors
In early January I started on the floors as I knew from past experience I would not be as fast as Debbie during a class specifically on floors. It helped me to do them as others had started their kits as well.
Before I painted or stained, I like to do a test run to decide colors and finishes. I gathered several colors of white paint, stain and some greens. Using the scraps from the floors I painted some white, some green and then used stain over the top of these as well as the bare wood.

I have used three whites and one green. I choose to not try the other greens I pulled out. The whites only have golden oak stain on half of them. 1st green (on left) is two types of varnish. Satin in front – it disappeared, and Gloss on back. 2nd green is only paint. 3rd green is Golden Oak stained over the paint. It looks darker in the unpainted spot than the front piece but that’s lighting tricking our eyes as they look the same side by side.
Initially, I was going with the Magnolia White, but once I actually painted I used the White. This is because pictures are great but under the lights in my studio, I just liked the White better.
I painted both pieces according to my selections, then sanded them as Debbie says in the instructions.
Here I have painted the floor, sanded really well and am applying the stain using a stain pen I refill. The top half is stained and lower is not yet.

The
Picking Pink
I really did not want to go to the store. I don’t go because of trying not to spend money but this time it was timing and also the weather. Then we had family health issues.
From my stash I pulled out any pink I thought I might use. I dabbed a bit of paint on the wallpaper sheets. A dab on every sheet so it was easy to compare the colors. I wrote which they were on one of them. That way I didn’t need to keep them sitting out and in my way. After watching the video from the first class and Debbie said she picked pinks but found out they should be called rose, I tried another color Roseberry. It will do.
Insert pic of the pinks
Lighting
I really prefer to light my projects. However I really do understand why designing a kit with lights is harder. Not everyone is going to want to try lights as many are intimidated by anything electrical. I decided to light the project.
I had already decided to utilize the beams for running wires. My issue was not having the type of lights I preferred. I went through my stash again to be sure and yes, I don’t have those. However I do have some that would work. Mega LED’s. I have used these before in my Petite Chateau. It is probably why I have them. These lights are larger but they have a nice finish to the edges on two sides. My cottage may be oldish but the lights will be modern.
Before I used them I did a test of how much light they will give off. I connected them to a battery pack and taped them to the ceiling. Then I held them over my worktable. I was concerned them might be too bright. But they aren’t because they are Warm White in color.
Doing this test also helped me decide on where the lights should go. The light do give off a circle and I wanted to use that circle. Next I held them over the wallpapers. It did help me to decide which papers to use where. I noted that on my papers.
For the non stair side of the first floor, I want the light in the center. I used the scored lines of the ceiling to center front to back. I marked in the beam area with a pencil.
Another consideration for lighting is deciding where wires will come out. I choose to have them come out to the front. This was also important to mark to keep it straight which was front and back. This is especially true as the ceiling gets turned upside down.
This picture shows the marking. In the middle of the beam are three marks together. The middle one is the center of where the light is to go. The two outer are the size of this light. Above in the laser cut beam alignment I have made a groove using my Stylo tool. It makes quick work of the groove using a cut off wheel. Down below on the side of the beam is a mark for the wire to go down/up to the ceiling. These marks were made on the side closest to a where a wall will be.

Next, is the results of using the Stylo on the marks on the beam. A flat area for the light, side groove for the wire.

Lastly is the groove I made in the underside of the beam for the wires. I did the groove in the ceiling board first and the underside of the beam later. I considered that the two might be too much, but was glad I did both.

I used only super glue gel to attach the beams and wires to hold everything in place. Note the beam is backwards to how it will go once attached.

Lastly see how the paint hides the wires really well. The wire on the beam edge (not side) will be well hidden by the light itself since this is towards the front wall once assembled. The sides of the light painted well but will also be unlikely to show but if they do the white helps them blend in easily.

I’m going to publish this as is. I wrote this over 2 months ago and have been so busy with making things to sell, I haven’t touched this beyond the stairs. Another post for another day.
Comments are welcome.
Happy miniaturing!
Preble