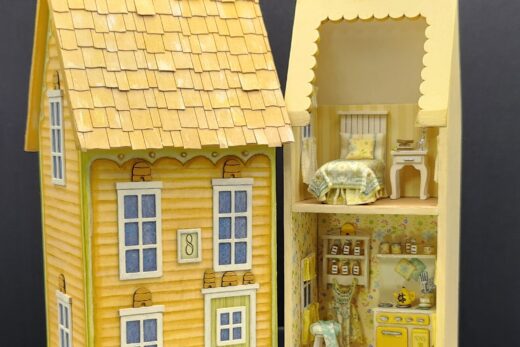
No. 6 of the Robin Betterley 2022 calendar club kit is a seamstress shop.
It’s purple! Mulberry is mentioned but wow the color of the shingles is interesting. With paint it is toned down.
Exterior
On a zoom session, someone mentioned all the sanding. It got me to thinking, could one do these without sanding? What is so important besides fit? One thing is avoiding gaps. The roof peaks are not square. It would be boring if they were because most roofs are not. No 6 is no different in that the roof is not square so sanding must be done.

I, again, used my Stylo+ tool to do my sanding but I usually have to do some finish sanding to smooth out. Although not much is needed on the exterior roof because it will not show under the shingles.

Before adding shingles, we paint the roof edges. I didn’t have the color suggested so I decided to mix something. I have been looking at the kits as they arrive to order paint if needed. This time I thought the Black Cherry I had would work. But it was not to my liking. I did use it as my base color and mixed in the middle color. It wasn’t right so I added in the purple. I wanted it to match a shade in the artwork. However I didn’t mix enough. I should have mixed enough to fill that little pot. Enough for the roof and most of the rest but not the whole project.

After painting the roof edges, I also did the corners. This was per instructions but was not necessary for this house. Now it was time to apply the shingles.

I really liked the use of corner art work because it covers the corners.

After adding corners, we assemble the doors and add to the house. I did use the shutters because they fit the windows.

Here is with corners, doors and windows.

Once again I added the chimney after I did the shingling. I cut around the chimney into the shingles. But this time I could have left off the top row and applied it after. That’s because it was on top at the peak.

Painting the chimney pots was easier on a toothpick.


Interior
In the instructions we are told to paint the edges of the side walls using the same color for the roof edges. Instead I used a lighter color that was similar to the siding of the exterior and coordinating with the interior wallpaper. I will use this color on the outside of the interior house as well.
Following along with instructions and apply the wallpaper when instructed to do so. One note is that there are two sets of wallpapers: one for each floor. This is so the wallpaper doesn’t add thickness between the walls and the floor. The wallpaper does not go between the floor and the walls.
I painted both sides of the second floor before applying the flooring. This helps with warping. Whether you paint both sides or not, Don’t apply the paper until the paint is dry. I tried too soon and got paint on the flooring. Then later tried to touch it up and made it worse. Still minor and was able to cover one spot completely later on.
Be sure to test each wallpaper piece before applying the glue. Trim to fit so it will go in easily.
Sanding is with rotary tool
I did not have any problems with the exterior but with the interior I noticed it was taking longer to cut the excess. I checked my cut off wheel and realized I should have replaced it a long time ago. I don’t remember doing so but at some point I had already flipped it over.
In this picture Top left: New VS Old I’m trying to show the white-ish part is shiny. That it is worn down to the adhesive used to hold the grit. Top right: New VS Old also but different angle. Bottom: compares New VS slightly used.

Why show this? To illustrate how sharp our tools are – will make a difference. It is also significant to me because I have not paid attention to this for these tools. Probably because I usually break these wheels first. The way I’ve been using them hasn’t resulted in a break so I need to check them often for wear.
Interior outside after sanding I painted it with a color close to the wallpaper.

I’m sure I could have done a smoother job of the edges, but I’m ok with this. The picture does show them more because it is larger than life.

Furniture
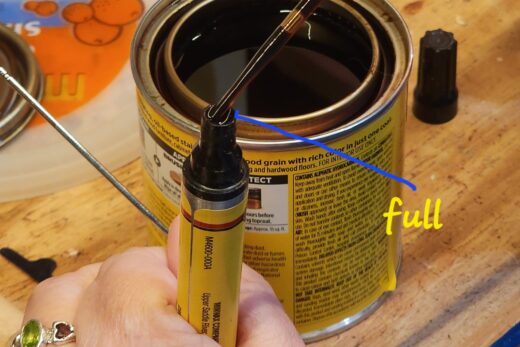
Rather than doing them all one at a time, I pulled all the furniture pieces and stained using a stain pen. I stained first in motherboard and then I separated. Next I sanded any spots needed and then touched up the edges with the stain pen.

Work table

Sewing machines and shelf
I really liked making the sewing machines. They just look so cute when they’re done. I wanted to keep one for something else but I didn’t know what that was.
I assembled them and then use the Stylo+ tool with a diamond bit for some sanding. The glossy varnish really made it pop.

Pin Cushions
I made the pin cushions using the clay. The larger one looked good enough so I painted it. The smaller ones I tried painting by rolling them in the paint I mixed up but that was a mess so wiped some off.
Later I realized that the clay wasn’t baked enough. I had stored them in a plastic box and they reacted with the box. Also I realized they were really too big. I gm not good at eye-balling tiny measurements. I pulled out some beads to use instead.
I chose one larger bead that I added glue in the center to hold the pins in place then added the tomato leaves, trimmed the pin wires, and added the tiny beads for pinhead. I also used beads for the other pincushions painting them in a different color. I should have painted them before adding to the bowl.

Cutting tools
These cutting tools are absolutely incredible. Almost didn’t want to use them.


Fabric
The choice of colors of the fabric was hard to choose which ones to use as loose or rolls or on the mannequin. I choose the ones for the mannequin first.
Mannequin
The mannequin needs sanding so I used my Stylo+ tool a bit but mostly a sanding stick or small metal files.
The fabric for the mannequin was extremely stretchy but I was careful not to pull too much.
Draping fabric on the mannequin was fun. I had to choose which fabrics and how to put them on.

For the bolts and rolls, I found that I prefer the edges trimmed very neatly as opposed to having a white edge. To make my bolts look neater, I held them in place when I place glue on the flap and then use tweezers to wrap it.

Ironing board
To wrinkle a piece of fabric for the ironing board, I applied thin white glue to the back and arranged it on a plastic box to dry.


Wall decorations
Buttons on a bulletin board and these others are thread.

Quilts were for the walls and the worktable.

To apply the wall art, I lay the building on its side to figure out my arrangements.

For the worktable I added two quilts. One draped on and the other is folded.

Curtain for the second floor window
I used lace to create a valance. A. Apply glue to lace so it will hold when cut. B. Hold over window (I used the one on the exterior since it was same size and the interior was glued in already). Trace around with a marker. Careful not to get on any lace I want to use. C. Apply glue to lace edging from top. D. Attach lace edging around panel cut out. Trim to fit. E. Finished valance in place.
I wish I had cut the loops at the bottom before gluing so it would hang more like fringe.

Cabinet
The construction was fairly easy however I made a mistake.

The cabinet didn’t fit. I had to remove the wedges and then turn them so making the cabinet square. Picture #54 clearly shows in the instructions which direction they go. I just didn’t give it proper attention.
We added the mirror to the wall. For mine it was not necessary to use the pencil marks. I actually glued too low. I quickly removed it. Thankfully the minor paper tear would be hidden. I glued the cabinet in place and then carefully added the mirror to be even on all four sides. Mine fit with a tiny gap that is hardly noticeable except in this picture.

Note how the rugs are placed. I may have covered a spot of paint along the wall.
The chair is beautiful. I want a whole set of these. I added bolts and then later a roll against it.


Shelving full of fabric
After all the wood for the bolts were used and rest of the fabric was rolled, it was time to fill up the shelves for the first floor. First I decided on which sewing machine to include. Then choose what fabrics to use under and beside. The bolts are fluffy but can be squeezed together for a neater look which I preferred. I used this plastic box lid to glue against. It was far easier to glue laying down and also not in the building itself. The sewing machines were glued to the bolts before gluing into the shelf so that they weren’t leaning backwards.


Once glued into the building extra bolts glued under and atop.
The last thing before gluing everything in place was to add some extra rolls made from the lace.
I’ve really enjoyed building these but it has made me realize how much I love doing my own thing. I feel I need to get these done so I can get back to what I have already.


Happy miniaturing!
Preble
If you enjoy my website, please consider making a small donation via PayPal.me/minismallpackages. Thank you!
Nice job. I loventhe color.