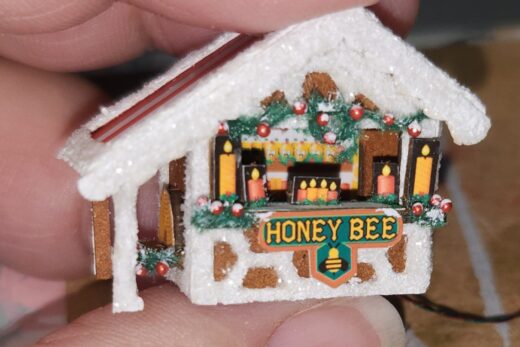
My next project was switching gears from 1/144th to 1/48th scale. I’m getting back to the 2022 Betterley’s Calendar Club that I got sidetracked from. The Honey House is number 8 in the series for 2022.
Building the house
In prior posts about the 7 previous houses, I talked about using my Dremel tool to sand the roofs to match the peak. This time I started with the Dremel but it needs some smoothing so I pulled out a new tool I received for Christmas.
This new tool can be found in many places online and in big box stores. It is a handle with sandpaper that attaches via hook and loop. It worked extremely well so when it was time to do the other roof I used this only.

This one came with 5 different grits (80 to 400) of sand cloth. I love the hook and loop and that this is fabric.
Paint
I didn’t use the milk paint. Instead I used Ceramcoat Straw. For the bee skeeps I used a mix of Straw with Terracotta.
I appreciate that Robin wants to expand our skilled and materials we use, however I have concerns with using a product that needs refrigeration if mixed with water. In the humid climate I live in, I am not going to risk it. I don’t use stick flat wallpaper paste for the same reason and that I have experience with. And yes, I keep my miniatures in the same environment as myself which is where they live best. I’m not saying it’s a bad product, just for me I have concerns for longevity where I live.
For the interior house I used Ceramcoat Old Parchment as it was a lesser yellow.
Wallpaper
It is probably not important, but if you want to keep the wallpaper organized after you cut it apart, you can mark on the back at the bottom of the paper. I recommend a light touch with a pencil to indicate left or right and at the bottom. Marking at the bottom was important to me to get the window blocks in the same position.

In assembling the interior building I had a gap in the back. I chose to fill it with wood putty.

It was sanded before painting.
Stove Assembly
The stove I ended up with the tab at the front so I spent extra time to get them smooth.

I also sanded the black off the sides because I knew I was painting with a light color. I forgot about using the sealer. But sanding also makes the line between pieces blend at the joined spot after painting.

When assembling the bottom of the stove don’t be folded by the tiny tabs. Those need to stay. I was tempted to trim them off but for once I decided to not to. That was correct. Those little tabs helped with position of the back against the two bottom pieces.
Secondly look really closely to the pics in the instructions. #36 shows the bottom two pieces upside down to how they go. The piece with corner cutouts will go to the bottom of the assembly. Make sure the two pieces in #36 are flush to the front (without the tabs). After flipping them over, the stove back then will rest between the two tabs I was tempted to cut off as shown in #37.
After assembly of the stove I was looking for the stove burners. I recall seeing them in the kit, but couldn’t find them. I searched high and low, going through my little trash bin and even cleaned up my desk a bit. I gave up and painted the burners that are laser etched in the wood.

I continued to assemble stove. I painted it with the gloss. And then I decided I did not like the yellow I used on the doors. So I repainted with a mix of Old Parchment with Straw. I decided that looked much better and closer to the color of the paper on the door.

Then another coat of gloss and it was looking great.
I have been taking it a different approach with painting the pieces from kits this time. I had been pulling out all the pieces that would be the same color of paint. But this time for the most part I did each of them separately. I can’t say that approach was better. If I were a person who tends to lose pieces, I would say make sure to not take them apart until you need each one.
Since I was painting each kit at a time, I did forget to use the clear vanish for a sealer on the laser cut edges. This is because I work for short while on the kit and do real life in between. To make sure I don’t lose anything, I have a smaller box I keep all the parts in. I keep them as much together as how they were packed.
But what happened to the burners, well turned out they were safe and sound in the little brown box they came in. When I was hunting for them I didn’t go past the fuzzy cloth to underneath. Low and behold there was several pieces I had not needed yet.
For the teapot, I went with the same straw color and added a bumble bee.

For the honey jars, I tested several different shades of yellow/brown using my alcohol markers on the side first. This was to see which I liked best on the clear plexi. Somehow I left on the plastic protective layer on one side of some of them. Be sure to remove both. I found I liked best a layer of two colors. One color on the front and one of the back. If I tried to color on the back only, the second color might wipe away the first one. That is the nature of alcohol ink, but I like its translucent effect. The tiny labels were really hard for me to read. I did figure out the direction. The short word goes to the top ‘RAW HONEY’.
Speaking of honey, did you know that honey has antibacterial properties and doesn’t go bad? Even if it gets crusty, just warm it and it will change back to flowing. Honey will taste different from based on what flowers that bees are pollinating.
Other furniture
The bed, I only had some trouble with the pleating. I need to figure out a way to make them hold while drying. Maybe I just too impatient or I had too much glue. The bedspread is so beautiful. I love the pattern and colors.
One thing about the curtains. I would have preferred to do them when before the right side was added. Or maybe add them to the window frames before they went in. It was awkward to add them. Thank God for tweezers.
The lamp was fiddly because the pin didn’t want to stay in the big bead as the hole was too big. I tried adding a piece of paper to the bottom but it was too bulky. Once I was finally able to get the pin in place with the glue dry I finished with the lampshade.

All done! It is so sweet in it’s yellow goldenness.


See it and all my other houses in this series here.
Comments are welcome.
Happy miniaturing!
Preble
If you enjoy my website, please consider making a small donation via PayPal.me/minismallpackages. Thank you!