No. 5 of the 2022 Robin Betterley monthly calendar club kits. For any other months I have finished check this page: The Secret Traveling Village
Consider this a supplement and just to show what I did differently.
Exterior
As mentioned in my other post about these little houses, is I use my Stylo + to do my sanding. To help me I will mark with a ruler where to sand down to. This time I needed to sand that line completely away. Then once the line was sanded away I can apply the second roof piece. This has to be sand down as well. For the exterior box it is not a problem if I make a mistake because it will be covered by the shingles. However I do want everything to fit properly.

I chose to use alcohol marker and need to decide on a color so I do a test on the wood excess. I like to match the provided artwork.

I apply the marker on the edges of the roof and along the house in case it’s seen at the corners and edges.
I apply the artwork to the house and also paint all the windows. This shows a box I’ve added double sided tape to for drying. I don’t use for painting because I don’t want the paint to build up along the edges.

After those are painted to my satisfaction, I glue them to the house along with the window boxes.
I am not using the shutters because I just don’t like shutters.

I also added window boxes to the sides because I thought it needed them. I realize they may not be seen once in the wagon we will have at the end.

I did not add the chimney before the shingles. Instead I did the shingling and then put the chimney in place and marked around it so that I could cut out the shingles that were not needed underneath it. I prefer this way than working around the chimney. I have also started the dry brushing.

This shows the additional dry brushing which makes a huge difference with this added lighter color.

After finishing the plants (below), I added a touch of green to each of the planter boxes. I didn’t add flower color because I wanted to stick with the blue/green/cream palette chosen.

Interior
I applied the butter cream paint on the edges before applying the wallpaper per instructions, but I didn’t apply any in the corners because I forgot that it could be important. I missed it if it was mentioned in the instructions this time. I recommend doing so if you don’t like the gap between the wallpapers because the back wallpaper does not have any extra room.

For the lattice roof, I glued all three pieces together and then I painted. I really like this lattice it’s something different.

The color I chose was what looked best with the flooring.
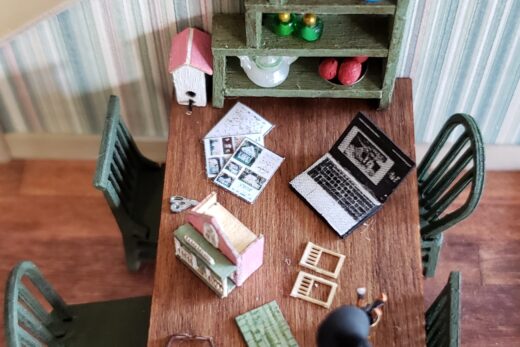
Accessories
I assembled the bench. I had one problem with the counter for the bench, the little side piece broke off, but I just glued it in place. Then I used alcohol markers to stain it.
Next up was the bins and boxes. There are 4 different styles.
Crates —- These have 3 different parts. In my picture I grouped them together because they are from two different thickness of wood.

Bins — These go on a shelf of the bench. They have only two parts from two different thicknesses of wood.

Potting bench box This is only two pieces. One is like a frame and the other flat.

Seed boxes I did not take any pictures but they have writing on two longer sides and consist of 5 pieces total per box. They are similar to the crate but shorter and same height all the way around.

Plants
The soil provided for the plants is dried coffee grounds. I am not a coffee drinker so by comparison this soil is very rich being much darker than my usual dried tea leaves. I found the soil intimidating only because the instructions said to mix up a batch. I was thinking this through and decided I need to prep the leaves. Once I actually mixed the soil, I just did a small bit mostly in the pots. I have some good leftovers. But I might start saving a few of my daughter’s coffee pods. 🙂
I used alcohol markers to color the leaves. I chose to do two different colors for each leaf. I’m sure now that was unnecessary.
The first plant I made was the vine to go in the lattice. I used the thread for the vine and then applied the leaves. The thread is colored using alcohol marker.

I’m disappointed with the vine because I used the thread and not enough. I can see that the wire would have made a different vine.
The hanging plant is totally different. I loved using the thread for it for both the string and the vine. I tried making some knots and even macramé but I didn’t like the first and didn’t have the patience for the second. It’s been decades since I did macramé.
I did follow directions to glue the string in an x to the bottom of the pot. I then glued to the sides as well. I pulled the strings up to find where to glue and also so I could add a knot at the top. I pulled the strings through the lattice but then decided to add a jump ring instead. I figured out how long it needed to be to hang from the ring attached to the underside of the lattice top. After getting that in place on the ring, I trimmed the extra string. The pot itself is glued to the window so it will ‘hang’ properly. Here is the result of all that fiddling.

Here is another plant I made. It turned out great as well.

Next I made the fern. I really loved how it looked with the lighter color in combination with the laser cut color. But when I was ready to use the broad leaves for a different plant, I couldn’t find them so I made another fern. Only this one had darker color and although it looks good it didn’t look good to me with the first fern. So I decided that I would have one fern as healthy and the other one maybe not.
I also made a plant using the wood piece.

The potting box is painted silver and soil plus leaves added. I thought I wanted a wood plant marker (seen in above pic bottom right), but later removed it.
Tools
My Gardener has collected multiple tools over time so that’s why they don’t all match. I highly recommend that you check your silver painted spots after you pull them off of the motherboard. I had to touch up paint after I had glued several in place. Detail brush in 30/0 size to my rescue. After the plants these are my favorite things. The lattice is really cool too.
To position the tools before gluing, I laid the Box on its side and laid out the tools. Then I glued them one by one.

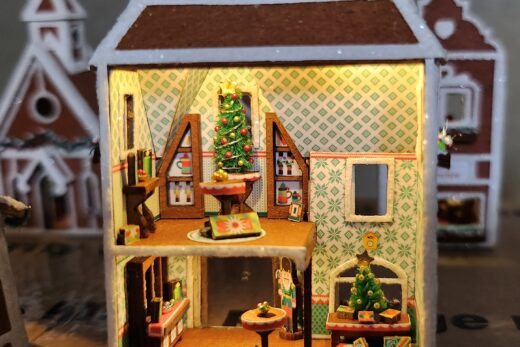
Putting it all together
This was fun deciding on what to put where. I really like to play around with placement of items before I glue everything in. For some reason I glued the bench and then decided to remove it to better place items on it.
In the left corner is a crate with the markers and a couple of tools. In front on the floor is two plants. I specifically separated the two ferns.

The Bench has the bins in place similar to the maker, but I missed the part about the kindling. My lower shelf just has some seed boxes. On the counter, the Gardner is messing around with starter plants maybe going to add them to some pots. The rest was just where can this neat sign or nice pots go. Lastly was the wood plant.

On the left side is the other fern. This is the one I really thought looked good with the laser burn. Contrasted with the second one, it doesn’t look healthy, so it is getting a drink sitting on two crates with one turned on the side.


The other four can be found here. Now onward to No 6. The Stitchery.
Happy miniaturing!
Preble
If you enjoy my website, please consider making a small donation via PayPal.me/minismallpackages. Thank you!