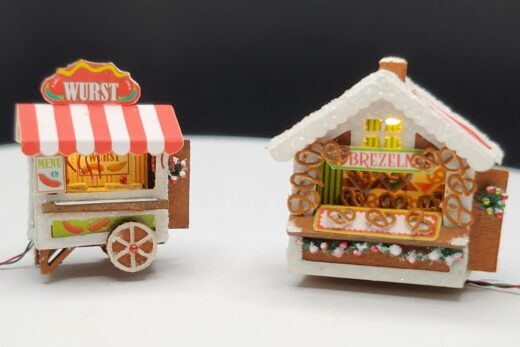
Finally back to the gingerbread building. I asked and got the two latest kits that were introduced this year for Christmas. I didn’t use to ask for minis because I would be buying them myself. But not the last few years. I only mention it because I think it is a good idea to ask or put on your list. You may have to give a link, but that works for me.
Now on to the building. For basic tips please read my main page. The below is by topic not in order of actual building.
White Trim
As mentioned in earlier posts for these buildings, I prefer to paint the trim white and separate from the motherboard. Then one by one I add the glitter using white glue. This is my second step after the coloring of the walls with the marker. However I add the trim according to the instructions.

When I cut out the roof stripe paper I kept the two pieces connected. I am not sure what was intended. This allowed me to easily cover the light wire in the center. The white trim fit well, but I added some glitter to the top edge where they met.
To fix gaps elsewhere, I painted and then cut a thin piece from the white card motherboard and glued that in the gap. Then I covered it with the glitter.


One thing that I lost, because the white trim wasn’t kept in the envelope or other more secure place, was the white trim around the sign. I cut my own from white scrapbook cardstock. I could have just added glitter around the edge or even just left it plain. Another fix option would be to layer the printed paper on the larger card (without having to cut inside) to have more room for the same glitter trim size at the edges. It wouldn’t be noticeable that it wasn’t on top.

Adding Light and the Roof
My third step, after the coloring gingerbread and adding glitter to the white trim, is figuring out where the light will go. I did initially think I was going to run the wire outside and even cut away a groove on the no door side (this gets hidden under white trim). Then later when actually building I decided I could run part of it down to the left inside corner beside the front opening. Mind that I am following along with the included instructions so I know how to build and how to add things like wallpaper.
In considering the electrical, I discovered two things. First, I had installed the front on incorrectly. The smaller tab goes at the top. That was affecting the roof position. In my below photo on the left, I have the wider tab at the top vs the right side shows the smaller/narrower at the top which is the correct way. Adding a mark to the inside of this piece while still in the motherboard might have avoided this mistake. Although knowing me I would not look for it and still install the wrong way.

The second thing I had noticed was that the roofs still didn’t line up with the tabs for the roof. The picture in my instructions shows a single tab and slot per side and per roof. But my kit has two tab and slots per side per roof. Maybe it was just me, but I felt the spacing of these were off. I know the center marking was.


After fiddling with it and working with the electrical light, I decided my best solution was to remove the tabs for the front. I did this by carefully trimming away the tabs. Then for the other back roof to remove the upper tab. Doing that allowed me to line up the roofs to the position I wanted and gave me a precut slot to run my wire through. I used the slots to help me position it still over the side walls. It was at the point when I decided to forego running the wire down on the outside. However the better location might have been on the right side near the door. I also cut a small notch in the floor for the wire to go out.

Another peek at where the light is and also where the wire shows to the left of the front, which can only be seen if held a certain way.

Now it is time to test the light I added. This is what makes it worth it to have added the greenery on the inside.

To do a quick connect, I am using a new connector that was given to me by a sweet mini friend. After fiddling with it multiple times, I decided it was important that my power supply needed an on/off switch too so switched out that portion later.

Note I am just testing the lights. I don’t wire these to a battery until later when all these buildings will come together in a larger project. I do have a temporary set up under plastic but the wiring is whatever I can get attached.
Adding greenery
When I added the wallpaper and assembled the walls I realize I want to add greenery to the inside walls. In the print is some greenery. To add it, I had to gently remove the front, which I had already glued on. I was really moving along or so I thought. Note to self: check for greenery printed on inside and decide if I want to decorate or not – before installing. I did want to.
These were done using the provided wire that you paint green and then apply the green flocking to. Then add the provided beads/balls.

In order to add the greenery, I used up the wire included. I also supplied some smaller balls. I later found some additional wire to use for the exterior greenery. This is exactly why I keep a stash of things. But it is uber important that said stash is organized to find such things as extra wire and extra smaller beads/balls.
When a uniform shape of the wire is desired, I like to wrap it around a paint brush or for smaller I use a straight pin. It helps to leave a tail on both ends. Then I slide that off and pull it apart to get it to be more flat and looser shape. If the wire is too hard to pull, I use plyers on both ends to get a better grip.

It can be difficult to get the shape of the wire just right before adding the green stuff. I found what helped me was to cut a piece of card (scrap of the white trim) the width of the roof so I knew what spacing I needed. It is difficult to hold the wire against the roof vs laying it down against a piece of card. This photo shows both the outside greenery and the interior lighted. The exterior greenery I added the white paint for snow.

Accessories
When I put together the risers for atop the counter, I even sanded the edges. After they were dry I made the mistake of adding the papers to the ends. I thought it strange that so much of the paper stuck up. I also found easier to deal with if the top paper is put on first. As I was decorating the fourth one (there is four sets) it dawned on me that I had put the papers on the ends and should have the other way which are taller but still needed a tiny trim at the top. I also realized I didn’t need to add paper to the fourth one as that is steps. Both of these two pictures show the risers incorrectly positioned.


I removed the papers very gently and then recolored with the marker all over before adding the papers in the right direction.
I also decided I would enhance the dollhouse that is an accessory for outside. This greenery was added directly to the paper rather than using wire.

All Together Now


Note, I am not adding the bases to my buildings as I will be adding them to a larger base for all when I put it all together.
Happy miniaturing!
Preble
If you enjoy my website, please consider making a small donation via PayPal.me/minismallpackages. Thank you!