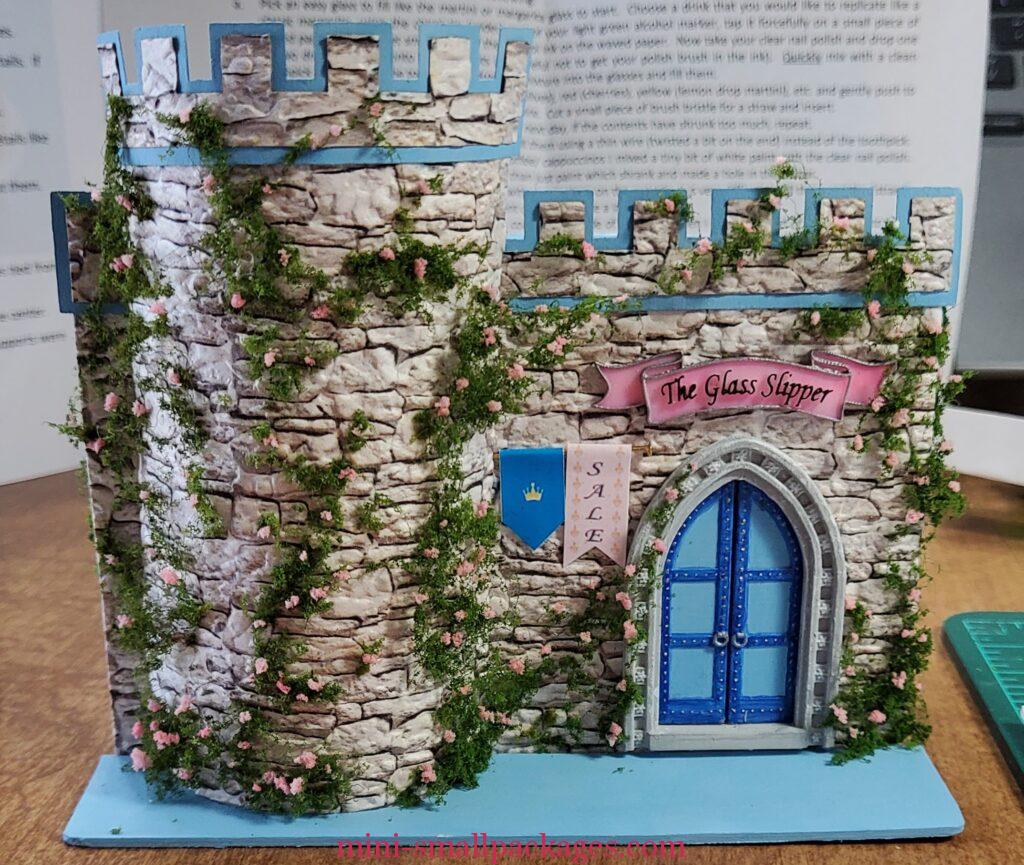
On my way from the OLHP, I came across this shoebox, a little shop.
A workshop by Kathy Abdinoor of Kit Kat Miniatures
I signed up for one workshop during the 2022 OLHP. It was really great being able to work on this together with others, especially with the instructor. Thanks to zoom, I have been able to take a couple of classes this way.
Kathy did quite a bit of prep work for us by spray painting the boxes that will hold this project. Having painted paper mache boxes before, I know it can take several coats so I truly appreciated this. We were to do several steps of prep work but those I was not able to finish before the class. For one reason was a modification I decided on.
At first I wasn’t sure if it was a box or a castle….
Front (lid)
Kathy laser cut the embossed stone paper and the dentil trim. We had to paint the blue accent of the trim as well as the lid itself.
The sign is 3d printed. I used alcohol markers to color the pink and black, plus silver acrylic for the edges.
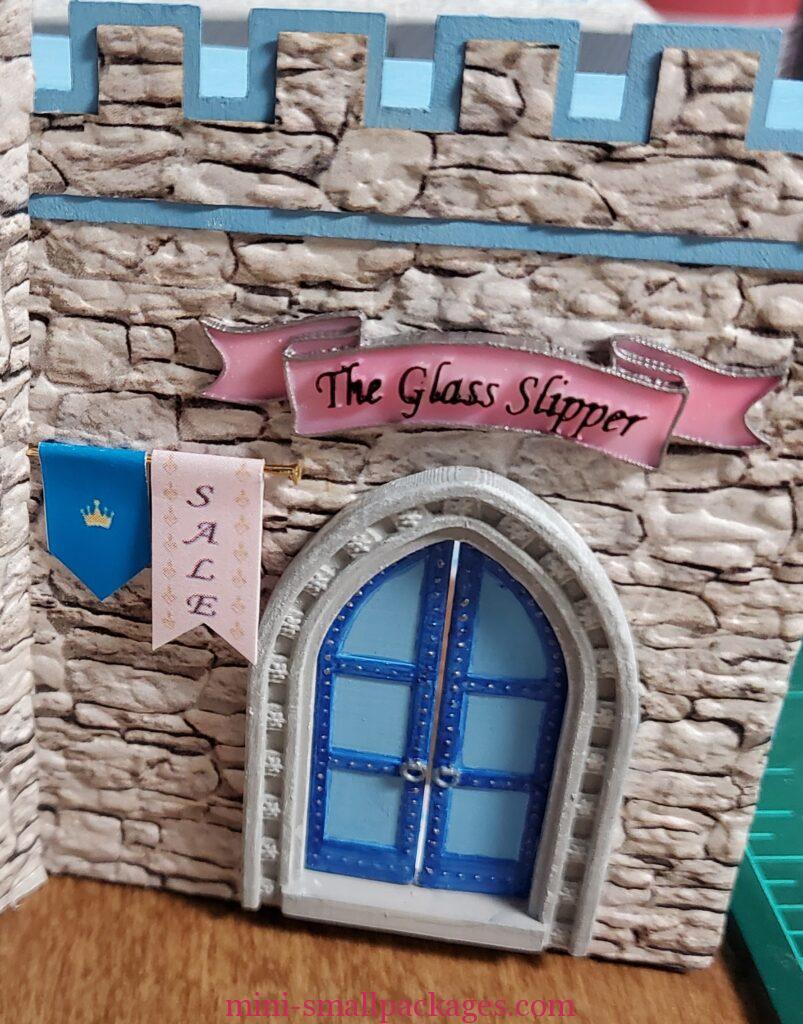
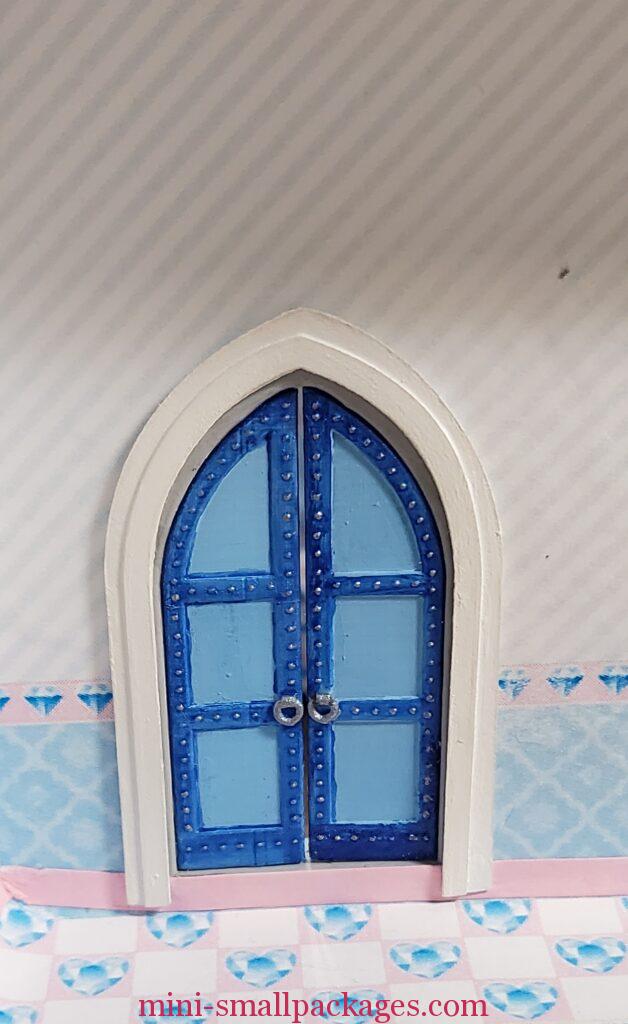
The door and frame are 3d prints as well. We started painting in class but I took too long so I moved on.
The paper banners are folded over a long pin. I couldn’t figure out why I could only use two. Turns out was a change I made.
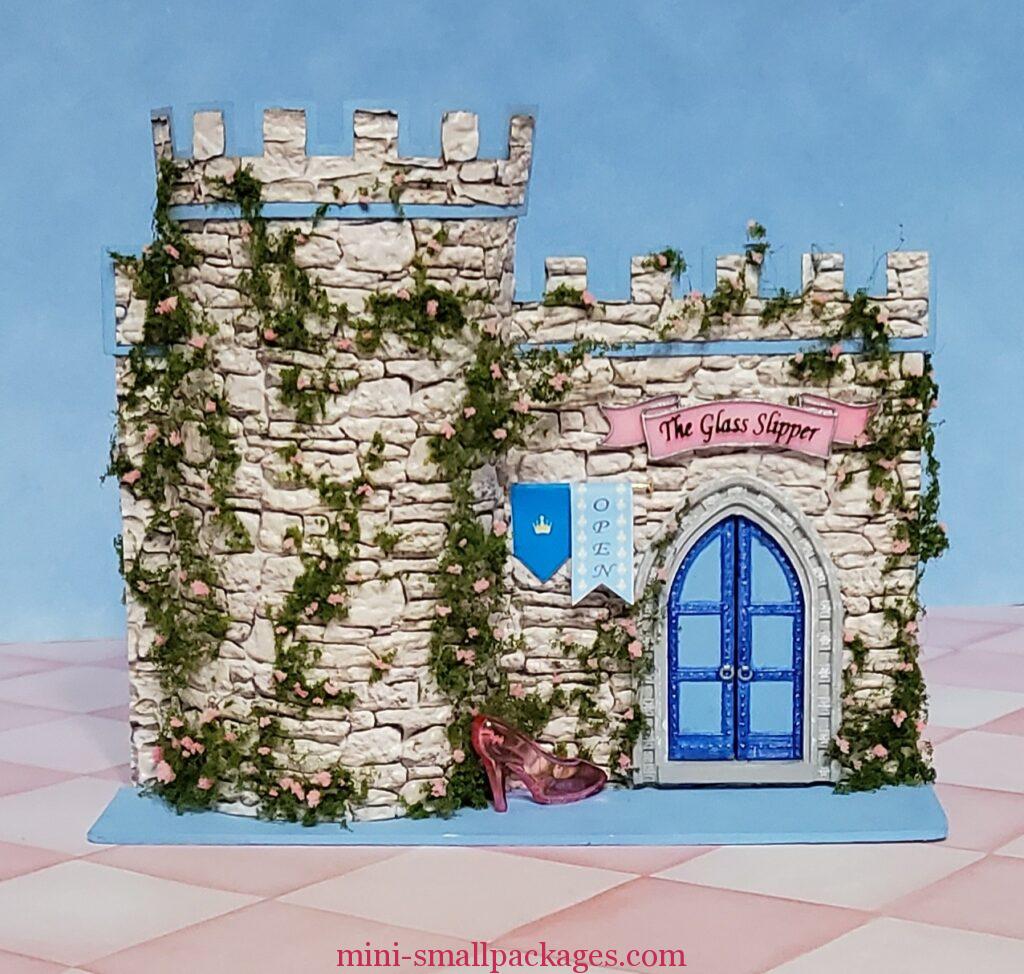
Landscaping
A landscaping kit is provided. On the tower only to start, I use the darker stuff to pull apart for vines. I added too much so the next day I took some off. This is after.
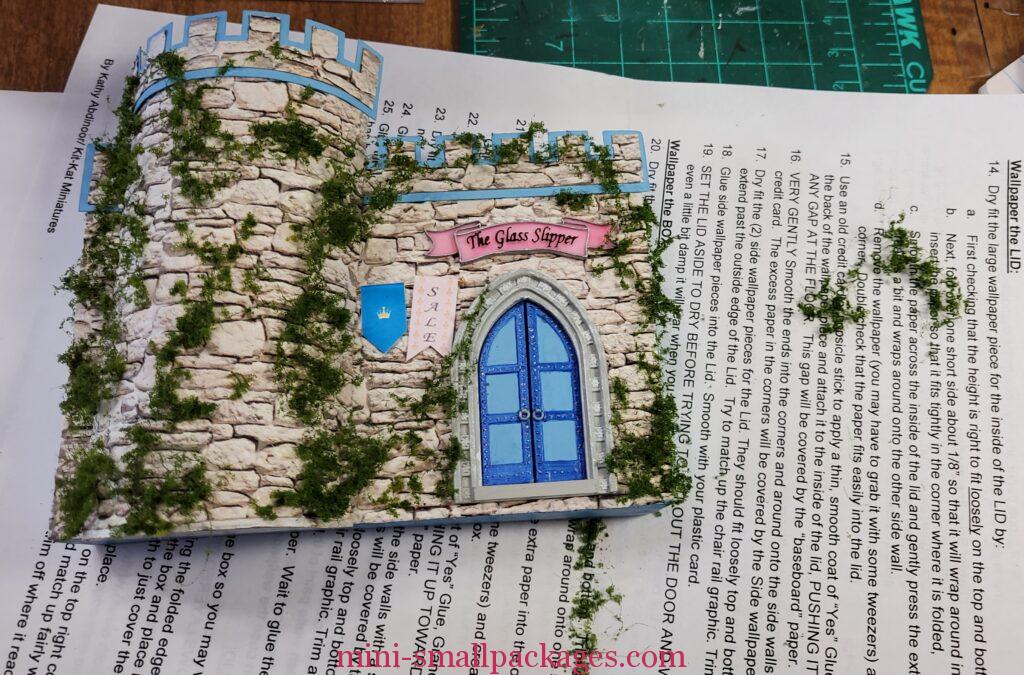
Then I used the extra to add to over the door and to the side of the door. I was more careful to not add too much. Certainly it is a fine line.
Next I used the flower bits but only the pink ones.
I control the size by pulling apart bigger pieces, which are sponge like product. I do this because I want my flowers to be sized relative to the vines.
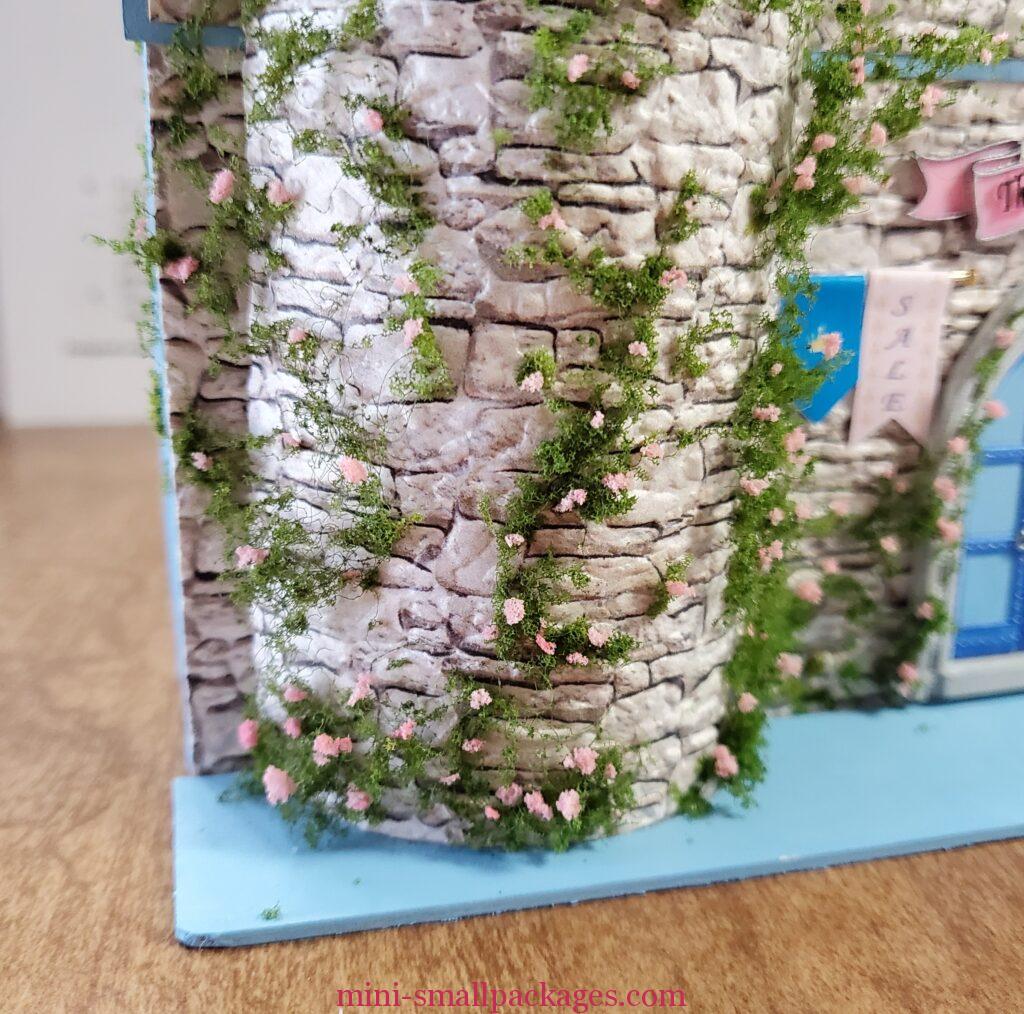
Every flower was placed individually by adding thin white glue to the vines using a tip bottle then placing the flower. I tried to make sure they were on top, side and under the vines.
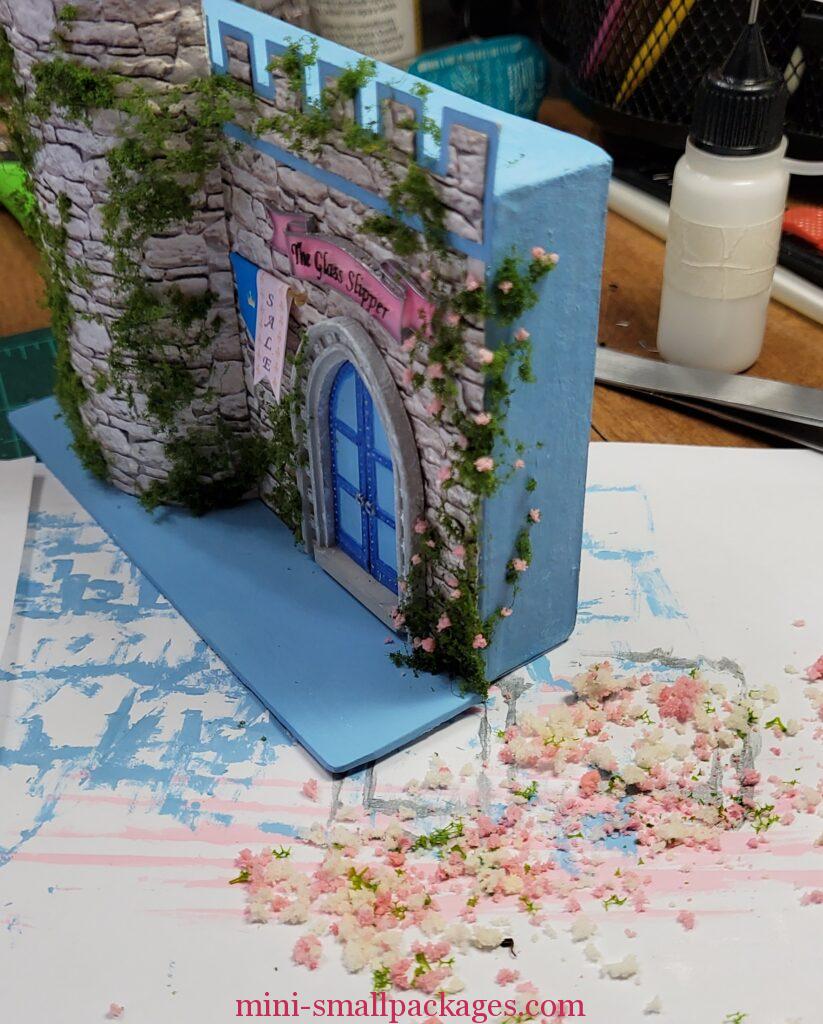
Sidewalk
I added the sidewalk because I had ideas of adding other things that didn’t happen. It is just matt board cut to fit the lid.
When I was finishing this off, it occurred me to add a final touch – a glass slipper
Inside – I’ll start with the lid
As I approached, it magically opened.
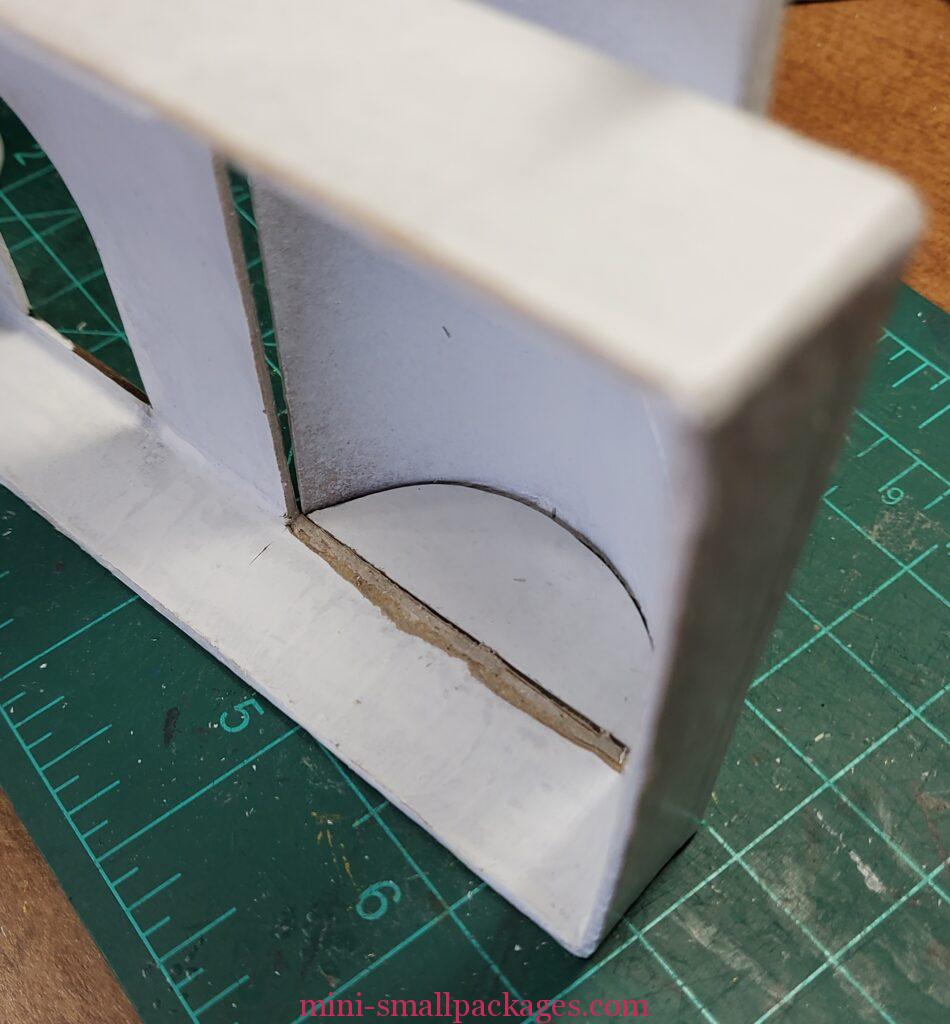
Tower Opening Change
It might seem like I want to always change a kit to make it my own but it was not what I was thinking. Instead I thought there was ‘lost space’ by not opening the tower. I was later to realize why maybe this was not part of the final kit design. (I’m not sure it was or not, but not relevant.)
I made this change during the prep-work before the class.
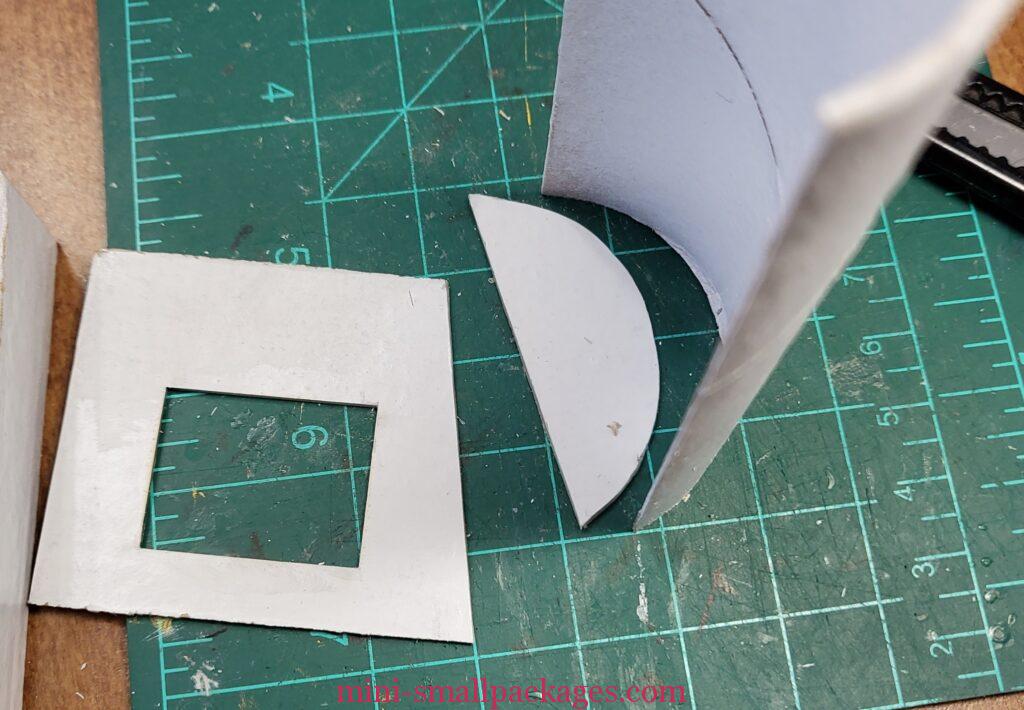
I aligned the tower (part of a paper towel tube) on the front and then cut a hole. I made sure the cuts were to the inside of the tower. It would be easier to recut the wall (of the lid) if too narrow than if I cut too wide.
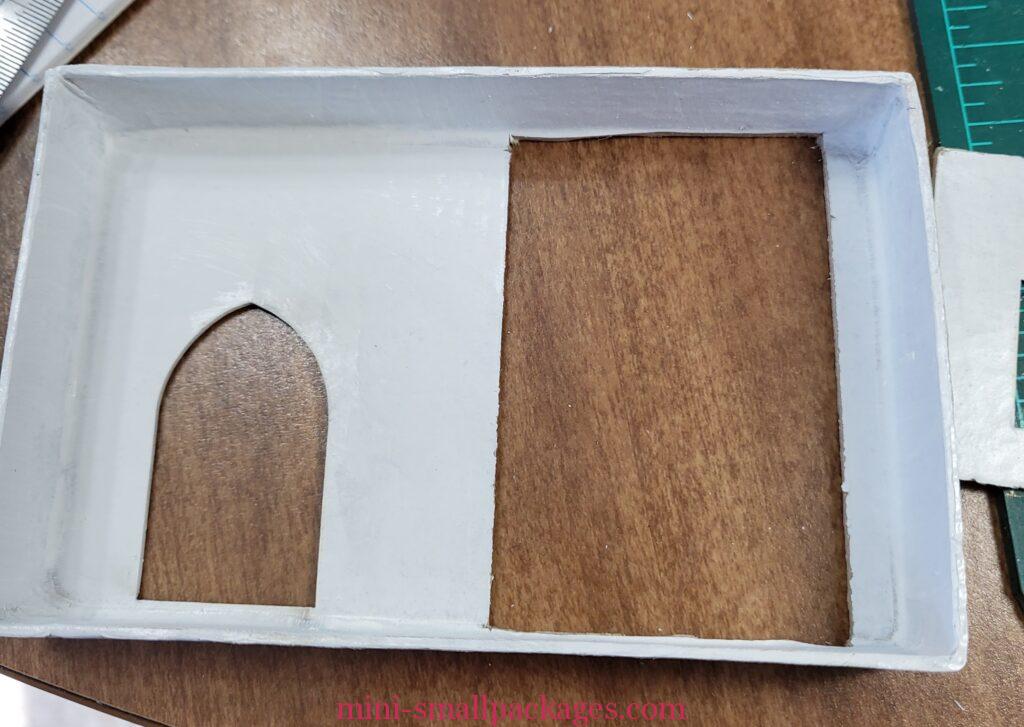
Then I cut out a floor for the tower. I didn’t know there were any semi circles already (because I didn’t read all the way through the instructions), but I am glad I cut my own because it fits the tower better. The instructions have one fit the tower to the precut semicircle which is fine but takes longer to dry and more clamping.
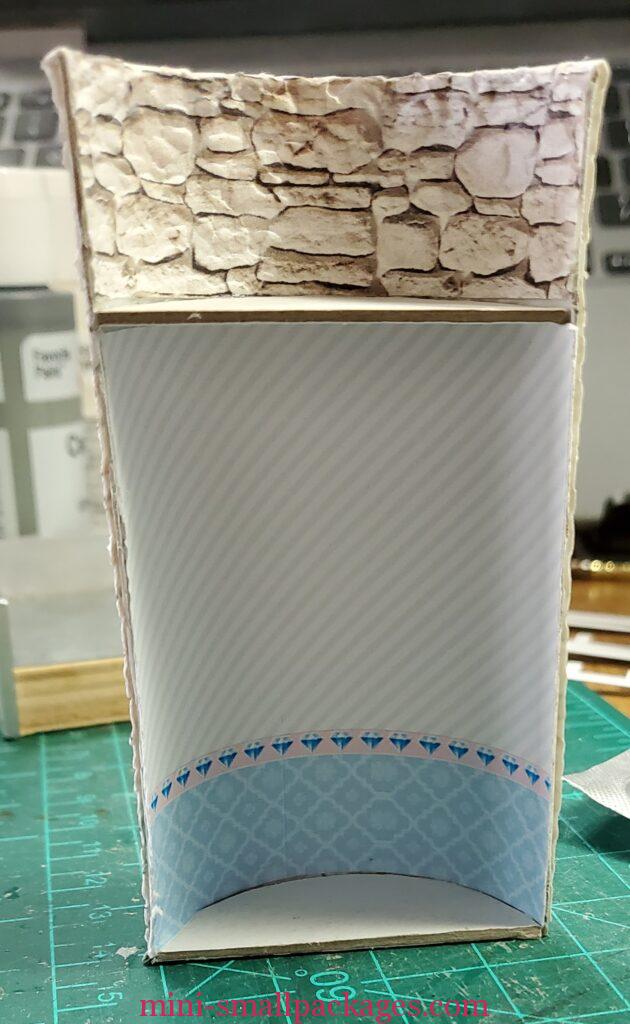
I get to class and I have installed some wallpaper but I didn’t paint blue edges. I proceed to do that as the class gets going.
I apply wallpaper and trim to fit the door and tower opening. This was done before the embossed paper, on the outside, to allow inside wallpaper to dry before cutting these openings. Although if embossed paper is applied first, just allow it to dry before cutting openings.
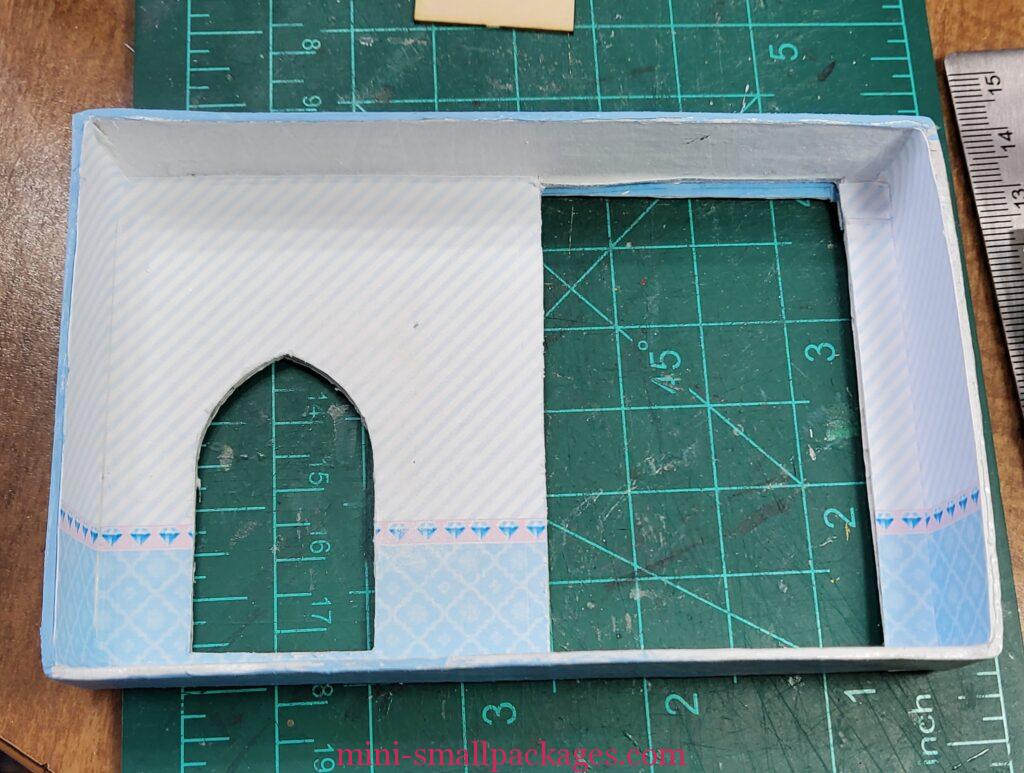
The stone paper has to be clamped around the tower until the glue is dry. After that I’ve added the semi-circles and wallpaper. I had just enough to do the tower inside.
After the wallpaper, we started adding the flooring. I’m good on the box but on the lid I realize my changes have caused a problem. The provided flooring only fits the lid not my open tower. I ask Kathy if she can send me extra. I was concerned that it wouldn’t match if I copied it and printed from my printer. I only asked because other interactions had already taken place and she was willing to send whatever was asked. I feel guilty asking for it because I made this change. I should pay extra for my changes. I’m so accustomed to diy or kits without in person classes, asking for extras just doesn’t occur to me.
Throne
The throne was easy to assemble. Initially I left it white because I forgot about having color. Then I saw another person’s kit and realized I liked the color. I went with pink in keeping with the baseboard color that matches pink in floor and wallpaper. I had used a pearl finish white so after painting pink, I added a layer of white pearl over the pink.
The footstool had to be cut and sanded to fit in the tower since the floor was lower.

Door and signs
During the class, I started painting the doors but it took several coats of the different colors to finish it.
I have left a blank wall above the door and tower. I want to use the pictures from the kit but because I opened the tower my picture usage is limited. Even limited by me because I have already framed the prints I want to use (both were included) and they don’t fit lower. But I was fine going higher I just had odd prints chosen. I had run out of the frames so I painted the edges of a couple more.
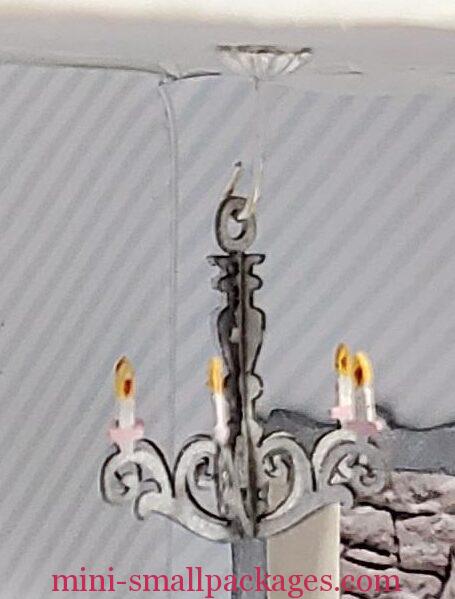
I decided I wanted a chandelier so I contacted Kathy about ordering one. She graciously sent me one. I made a mistake as I installed it, getting some silver on the wallpaper. I added the banners strategically.
The artwork I chose I used on the insides of the lid which meant I couldn’t properly close the lid over the box. When I placed the mirror I intentionally added it so it would also stop the lid from fitting.
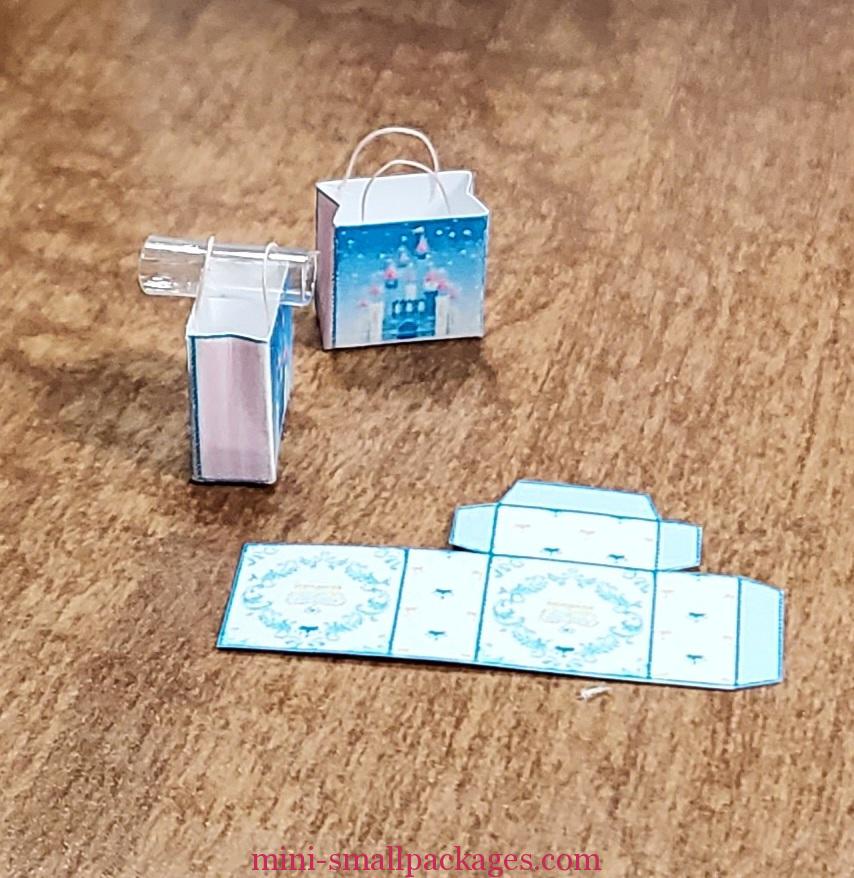
Later I added the shopping bags since I wanted to fill up spots. I had them available so I used them. Kathy had provided several designs so there was plenty.
Inside the (box side) shop
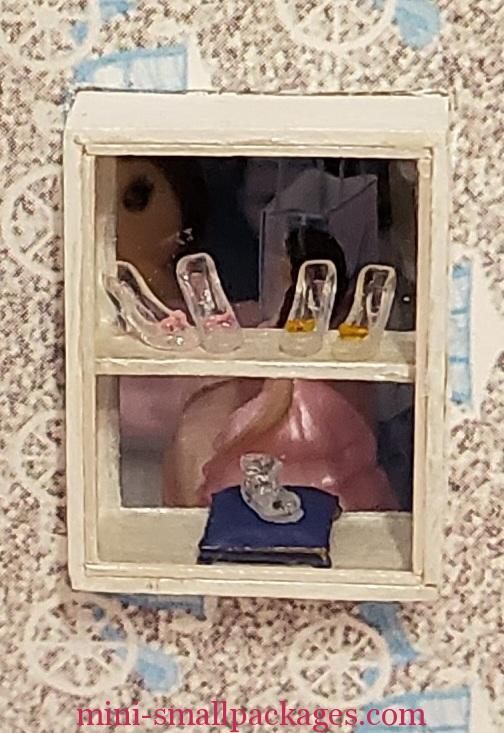
Niche
As class progresses, I hear Kathy talking about the niche and I felt sad I wasn’t going to use it. Then I get this bright idea for my second mod. I’ll add it to the side of the box. These pics were from after class once it was fully installed. It fit together perfectly and I had to cut a hole for it to fit just fine. A sharp blade is crucial always.
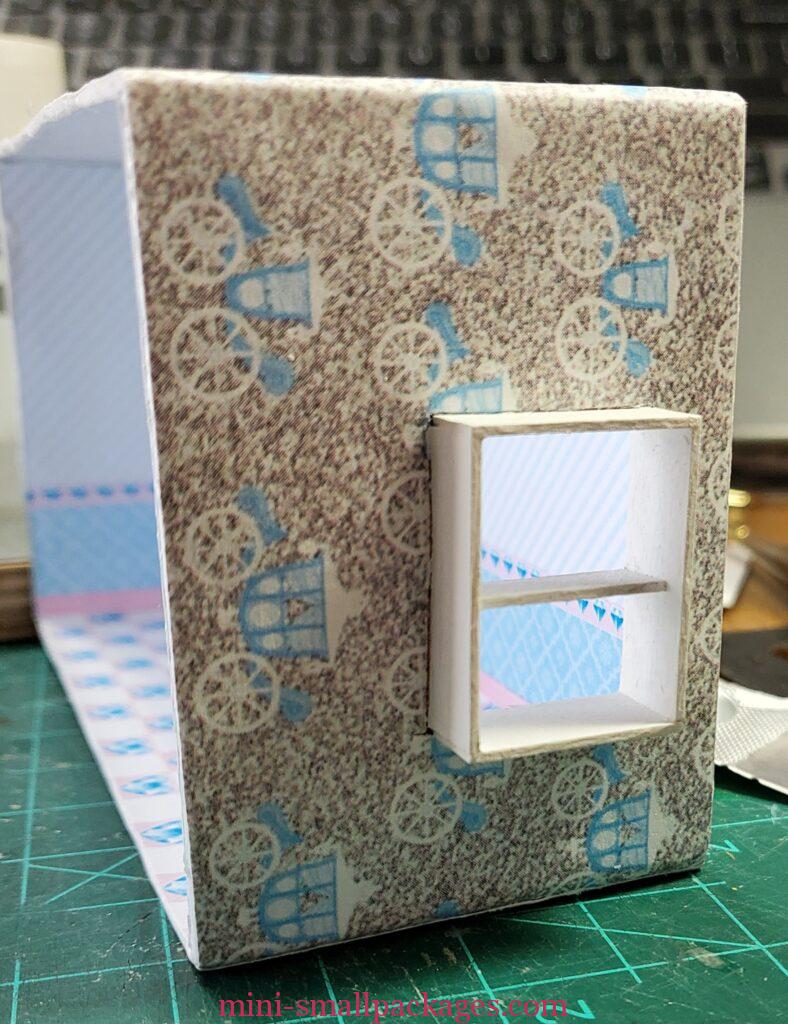
The niche frame will cover the interior.
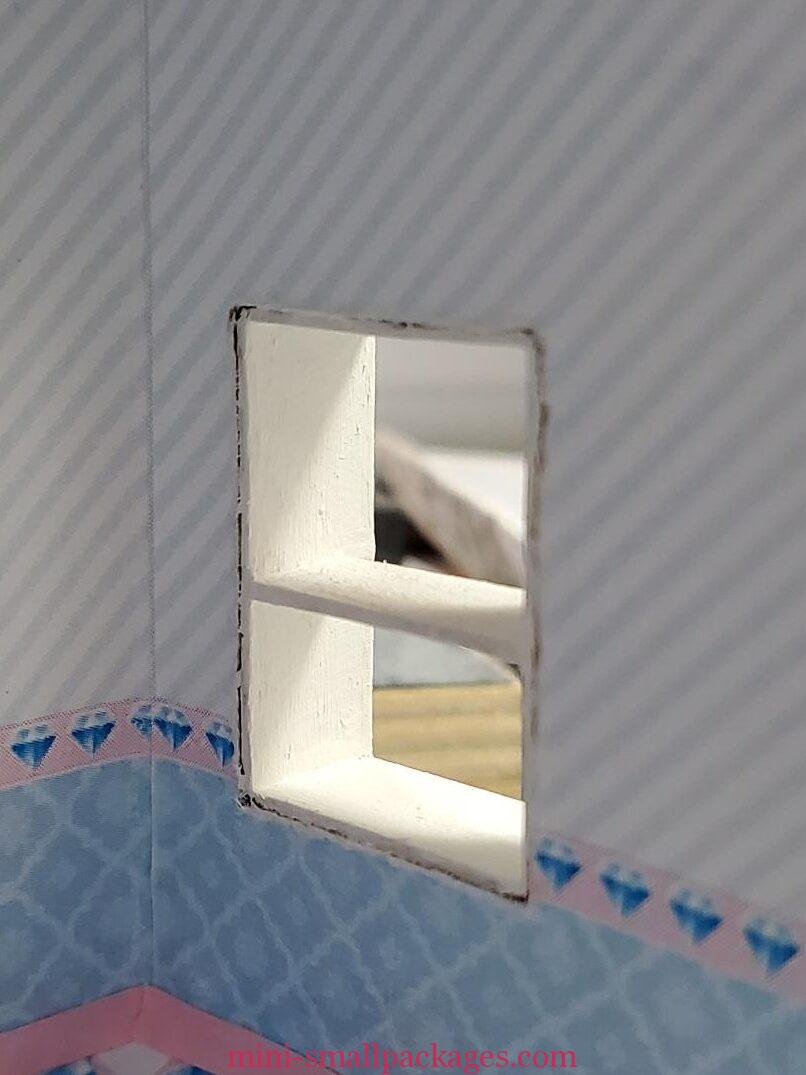
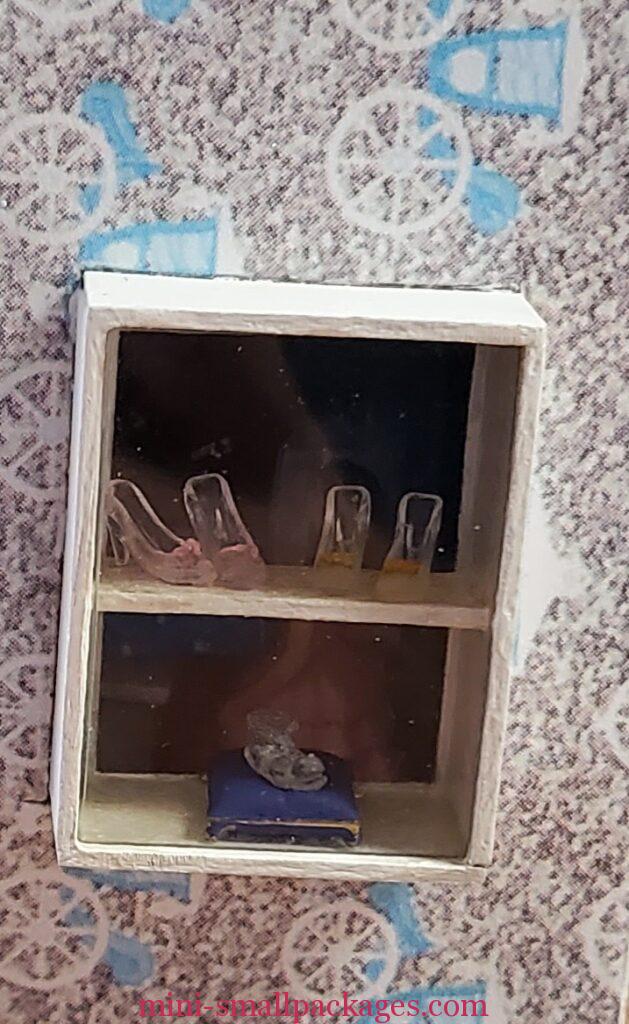
After the glass slippers are done I was ready to finish up the niche. I wanted to display the the souvenir we got for the OLHP and the glass slippers in the window. I glued those in place.
I search my stash for plastic packaging I save just for this type of project. I use my metal triangle to cut a right corner. Then I hold that corner in the window and use my craft knife to mark (scratch) the other corners. Next I use a marker to mark beside the tiny and hard to see craft knife scratch (mark). The marker is used on the side I will cut away. When cutting plastic one is really scoring it and only need about a third of the way and then can bend it a couple of times and it will break. I do this scoring with a craft knife for thin plastic. Doing the score, bend, and break method results in a clean cut. It also avoids increased possibility of scratching if the ruler slips because cutting requires more passes than other materials.

I test fit and need to trim. The first trim I do with the craft knife. The second one was done with scissors. This plastic is thin enough to cut using scissors successfully. Other plastic may seem able to use scissors but it will sometimes fracture near the cut and usually on the wrong side of the line.
To finish the niche, I added micro cut lumber that I painted before using. Once dry, I held the stick against the window to one side, mark with my craft knife, then cut and glue in place. Then repeat for three remaining sides.
Decorating the inside
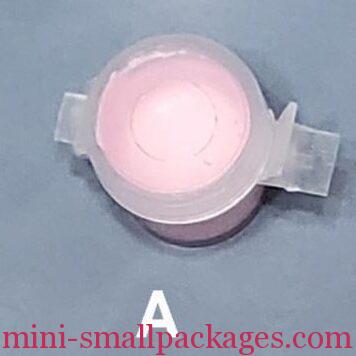
During class we wallpapered (inside and out), added flooring, and the baseboard. All of these were provided in the kit. There was enough for each surface but not much extra. There was enough baseboard printed but I couldn’t cut straight that day on these narrow pieces. I cut every one of the strips wrong. I would have been better off to use scissors and I avoid using them for long cuts. My replacement was quilling paper. I have a stash of white just for this purpose. I tested the alcohol marker but it wasn’t right, nor was any of my paint. Instead I mixed some to match best I can. I made a point to mix extra and store in one of the little flip lid pots. Now I want more and can’t find this style available.
Chandelier
The chandelier was assembled in class but I didn’t like the colors I choose. Kathy had spray painted it silver for us. I added color to the candle flames which is what I didn’t like and had to paint white and then repaint.
Proprietress
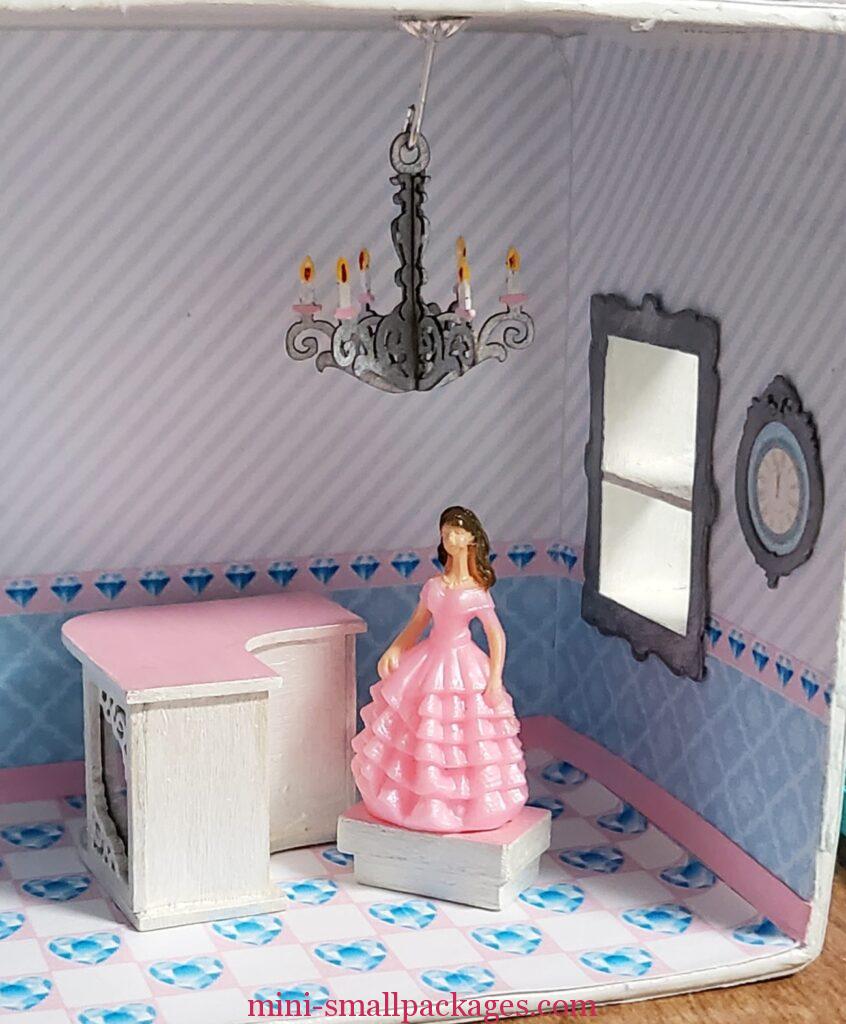
My proprietress, Cindy, was from the committee of the OLHP. However she is really short so I made her a platform for behind the shop counter. It was made from leftovers of different kit.
I also touched up her paint.
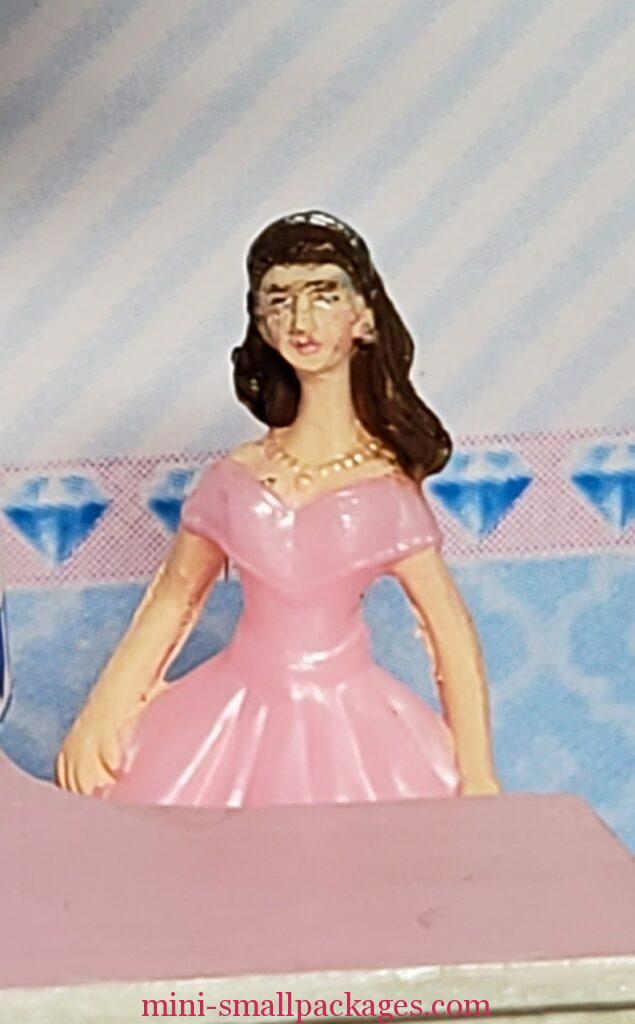
I should always take a photo like this and zoom in. I see how bad the shift of the mold on her arms. I sanded the outer arm but not the inner, opps. Thankfully this is really zoomed.
I used white pearl paint on all the furniture. The counter like the throne was painted with the pink on top.
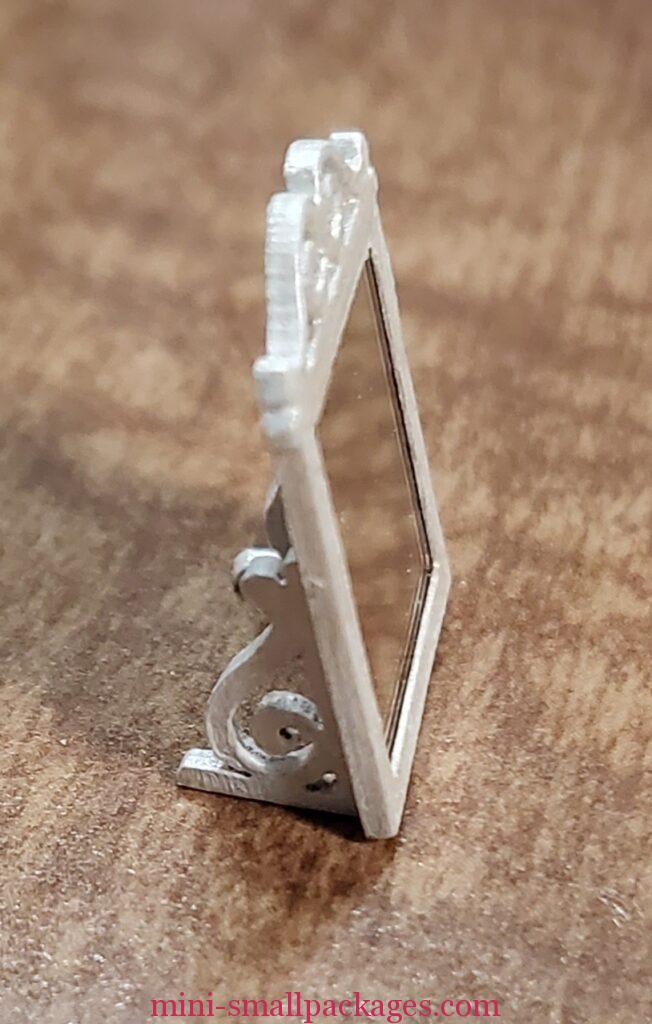
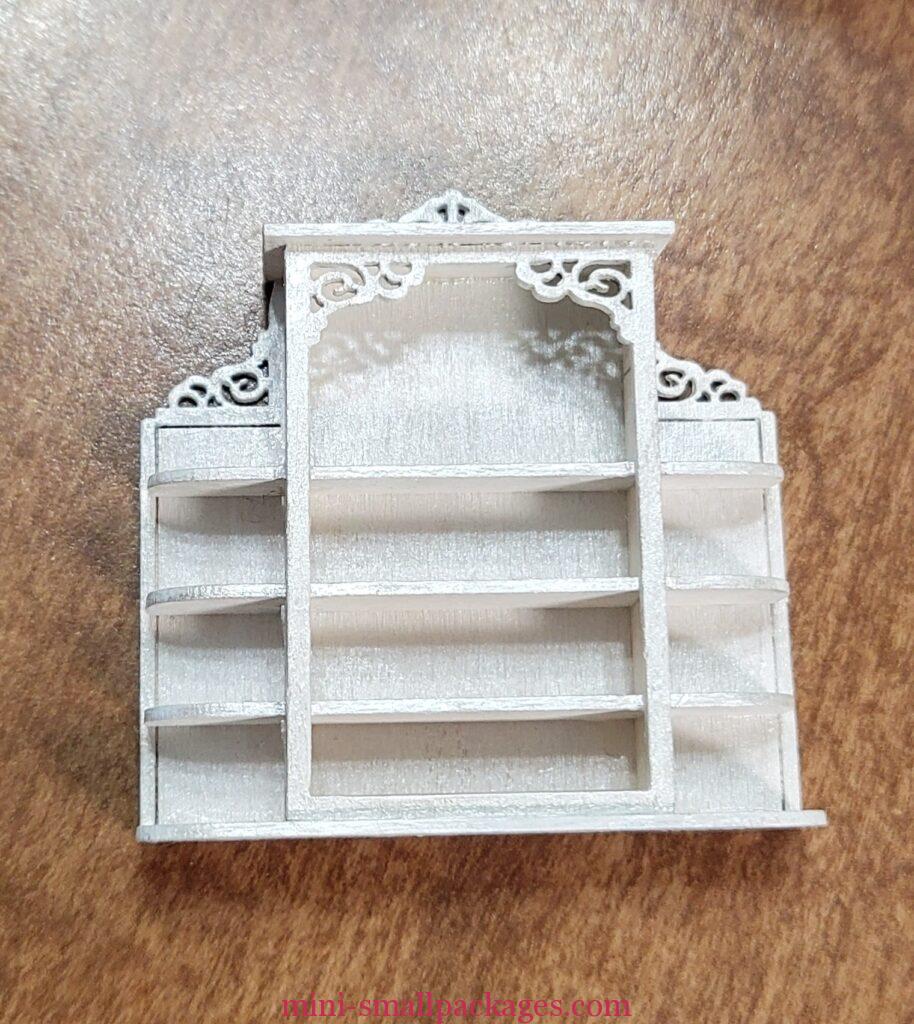
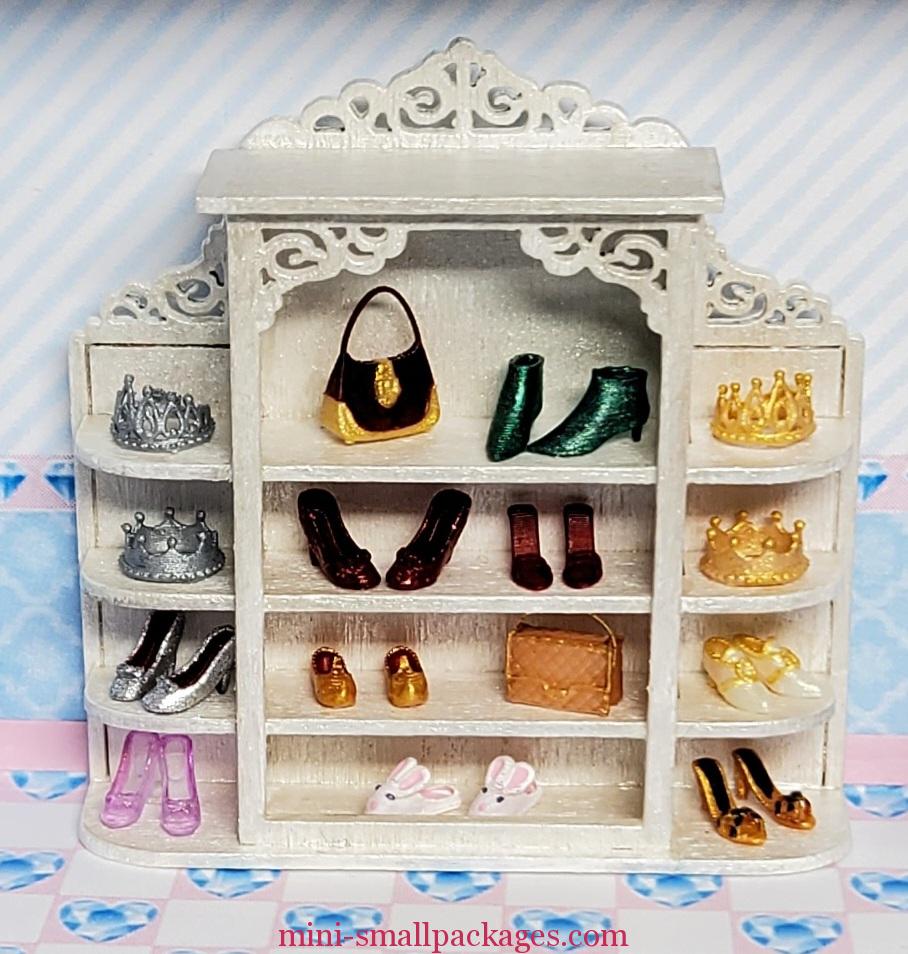
Display Shelf
I love how beautiful the furniture is for this kit. The scroll work is perfect.
Shopping Bags
To make the bags, I line up the lines over the straight edge of my metal ruler and then bend.
Next I added handles. They were made from thread I stiffened with glue first. I wrapped them around the end of a paint brush to shape. To make the handles uniform across all the bags I used this clear tube to wrap the thread over while gluing in place inside the bag. However it was easier to glue the thread in a loop with the tails crossed in an x. Then glue into bag, still using the clear tube.
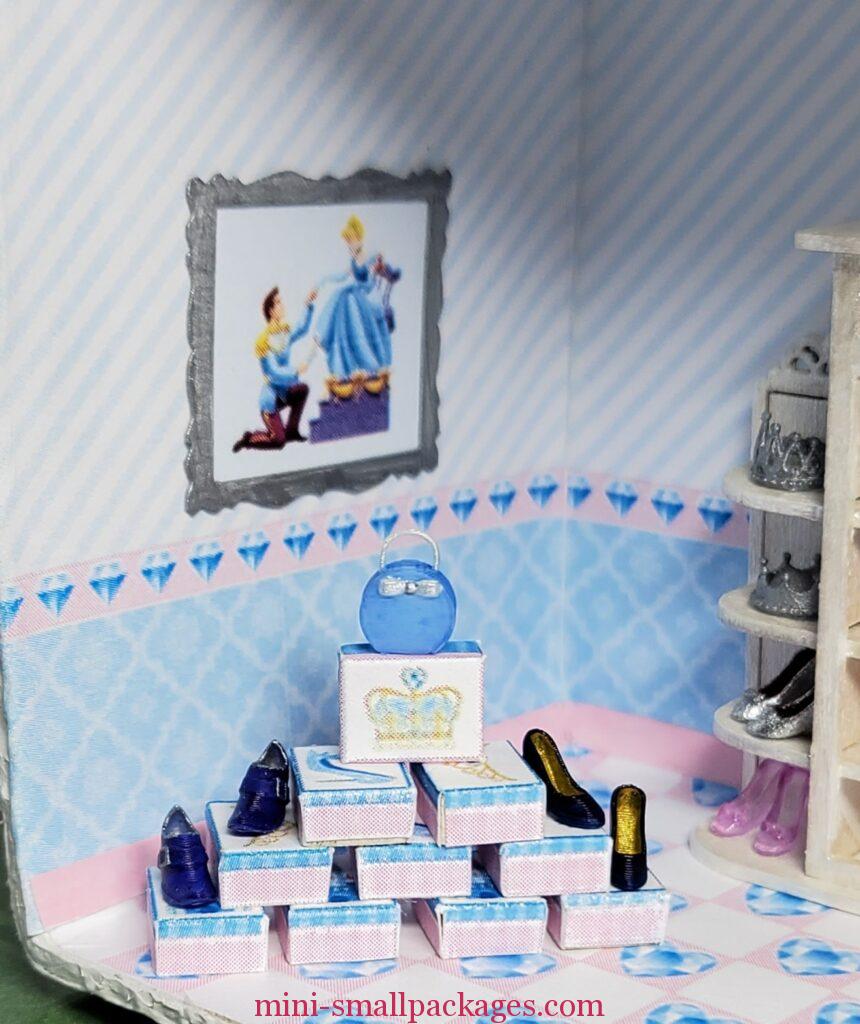
Crowns
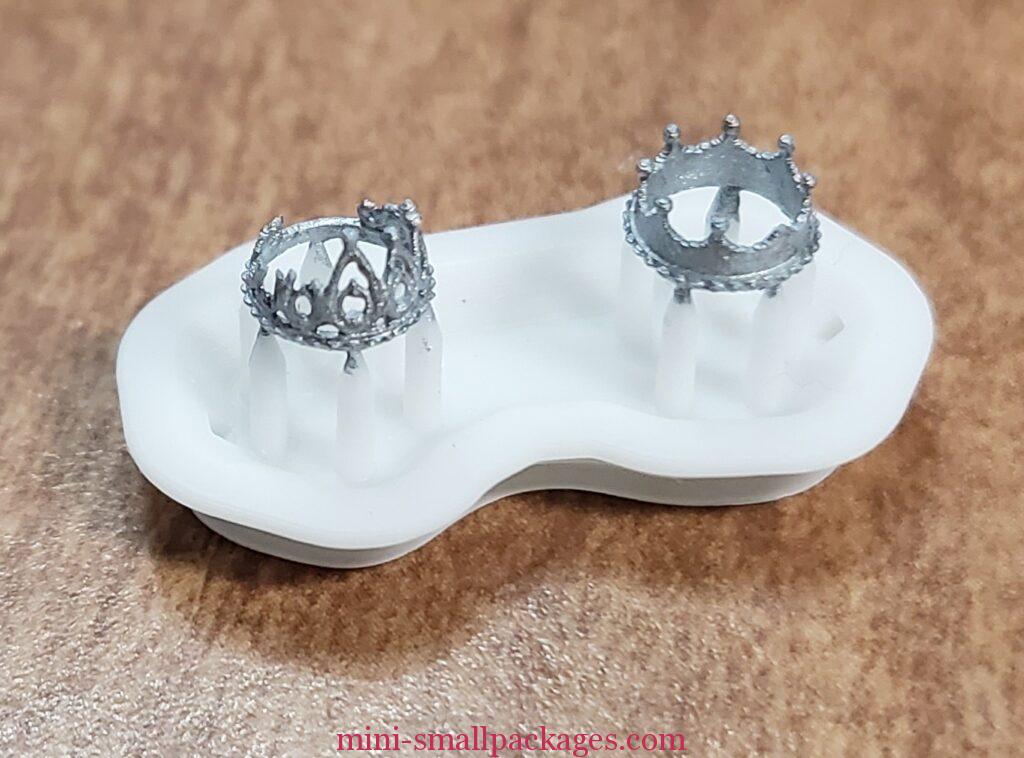
These crowns from the kit I painted with silver paint. I painted another set gold I purchased.
Shoes
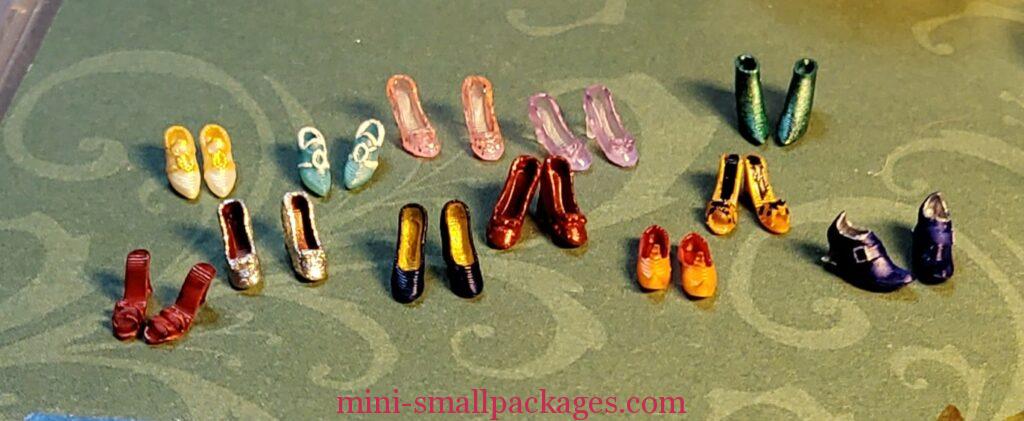
There were several pairs of shoes included, but I bought more to make sure I could fill the shelves.
The glass slippers present a challenge for me since I don’t want to use nail polish. I tried a couple of other options but none worked. I decided that as small as they are I could live with using nail polish as a coating. It really does make them look like glass. The bows are colored with alcohol markers before applying the polish. The shoes before the polish is applied look frosted like the raft below.
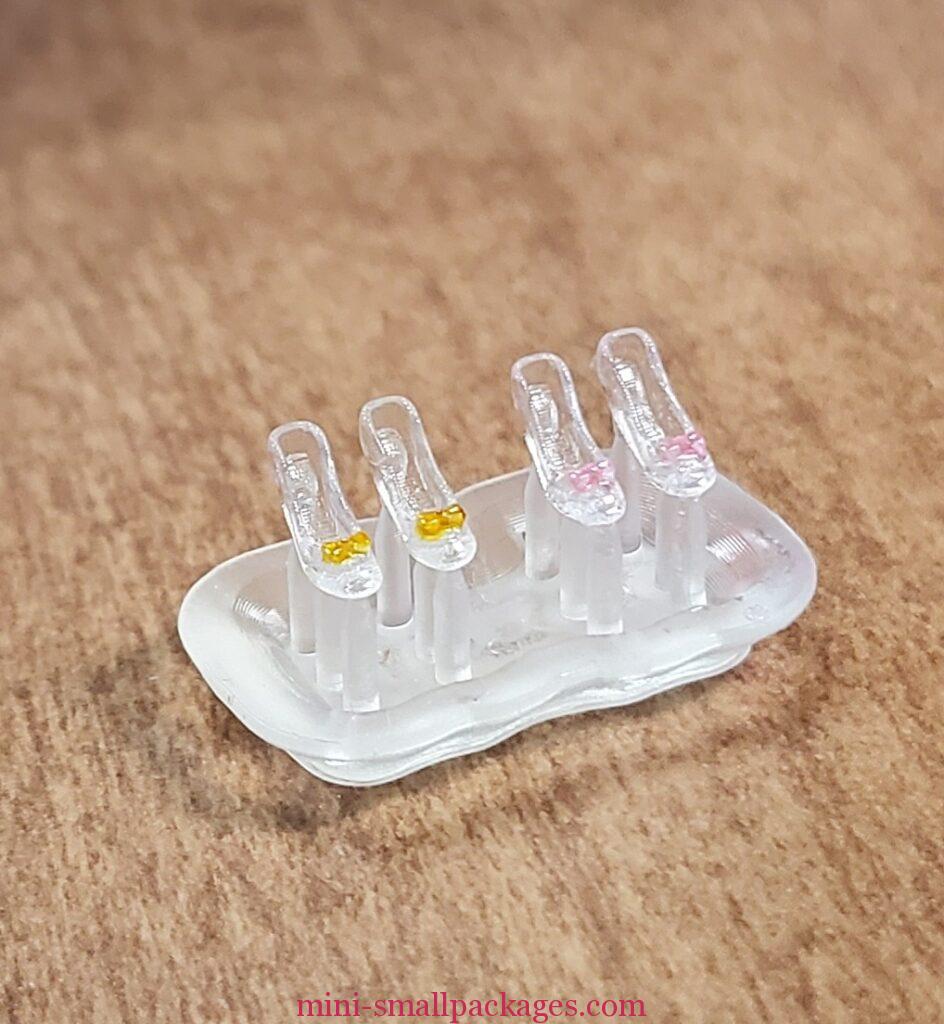
To color the rest of the shoes I used a combination of alcohol markers, acrylic paint, and nail polish. I decided that after I had applied the clear to the glass slippers, I might as well try some glitter colors I had as well. I might be willing to purchase other glitter nail polish,but would have to be the ultra fine glitter.

Alcohol marker AM, acrylic paint AP, nail polish: NP
Red in middle are AM + glitter NP, pink in back are AM + glitter NP, purple in back are AM + NP, most gold touches are AP, and purple and silver on right are AM + silver AP.
I made two pair of shoes for Dorothy. The silver with red lining (left outside 3rd shelf) and red ruby ones (middle 2nd shelf) are for her. The silver is what was in the book but the ruby ones are iconic from the movie. The bunny slippers were from the kit but I had to have another pair too.
Purses
I don’t recall which ones (if any) came with the kit. I purchased several separately. Two are in the display shelf and a third was added to the shoebox display.
Artwork
The niche frame, clock were obvious choices. However the other framed art was not. I even used a frame to trace 2 other frames. I ended up not having as much room as the prints I picked so most went to the lid instead. The banners took up some wall room I could have used, but I wanted them behind the counter. Kathy initially was going to just provide paper shop signs but then was able to 3d print. I love the 3d print I used outside, but decided to use one of the paper prints as well. To give it dimension on the wall I added a piece of thin cardboard before gluing above the display shelf.
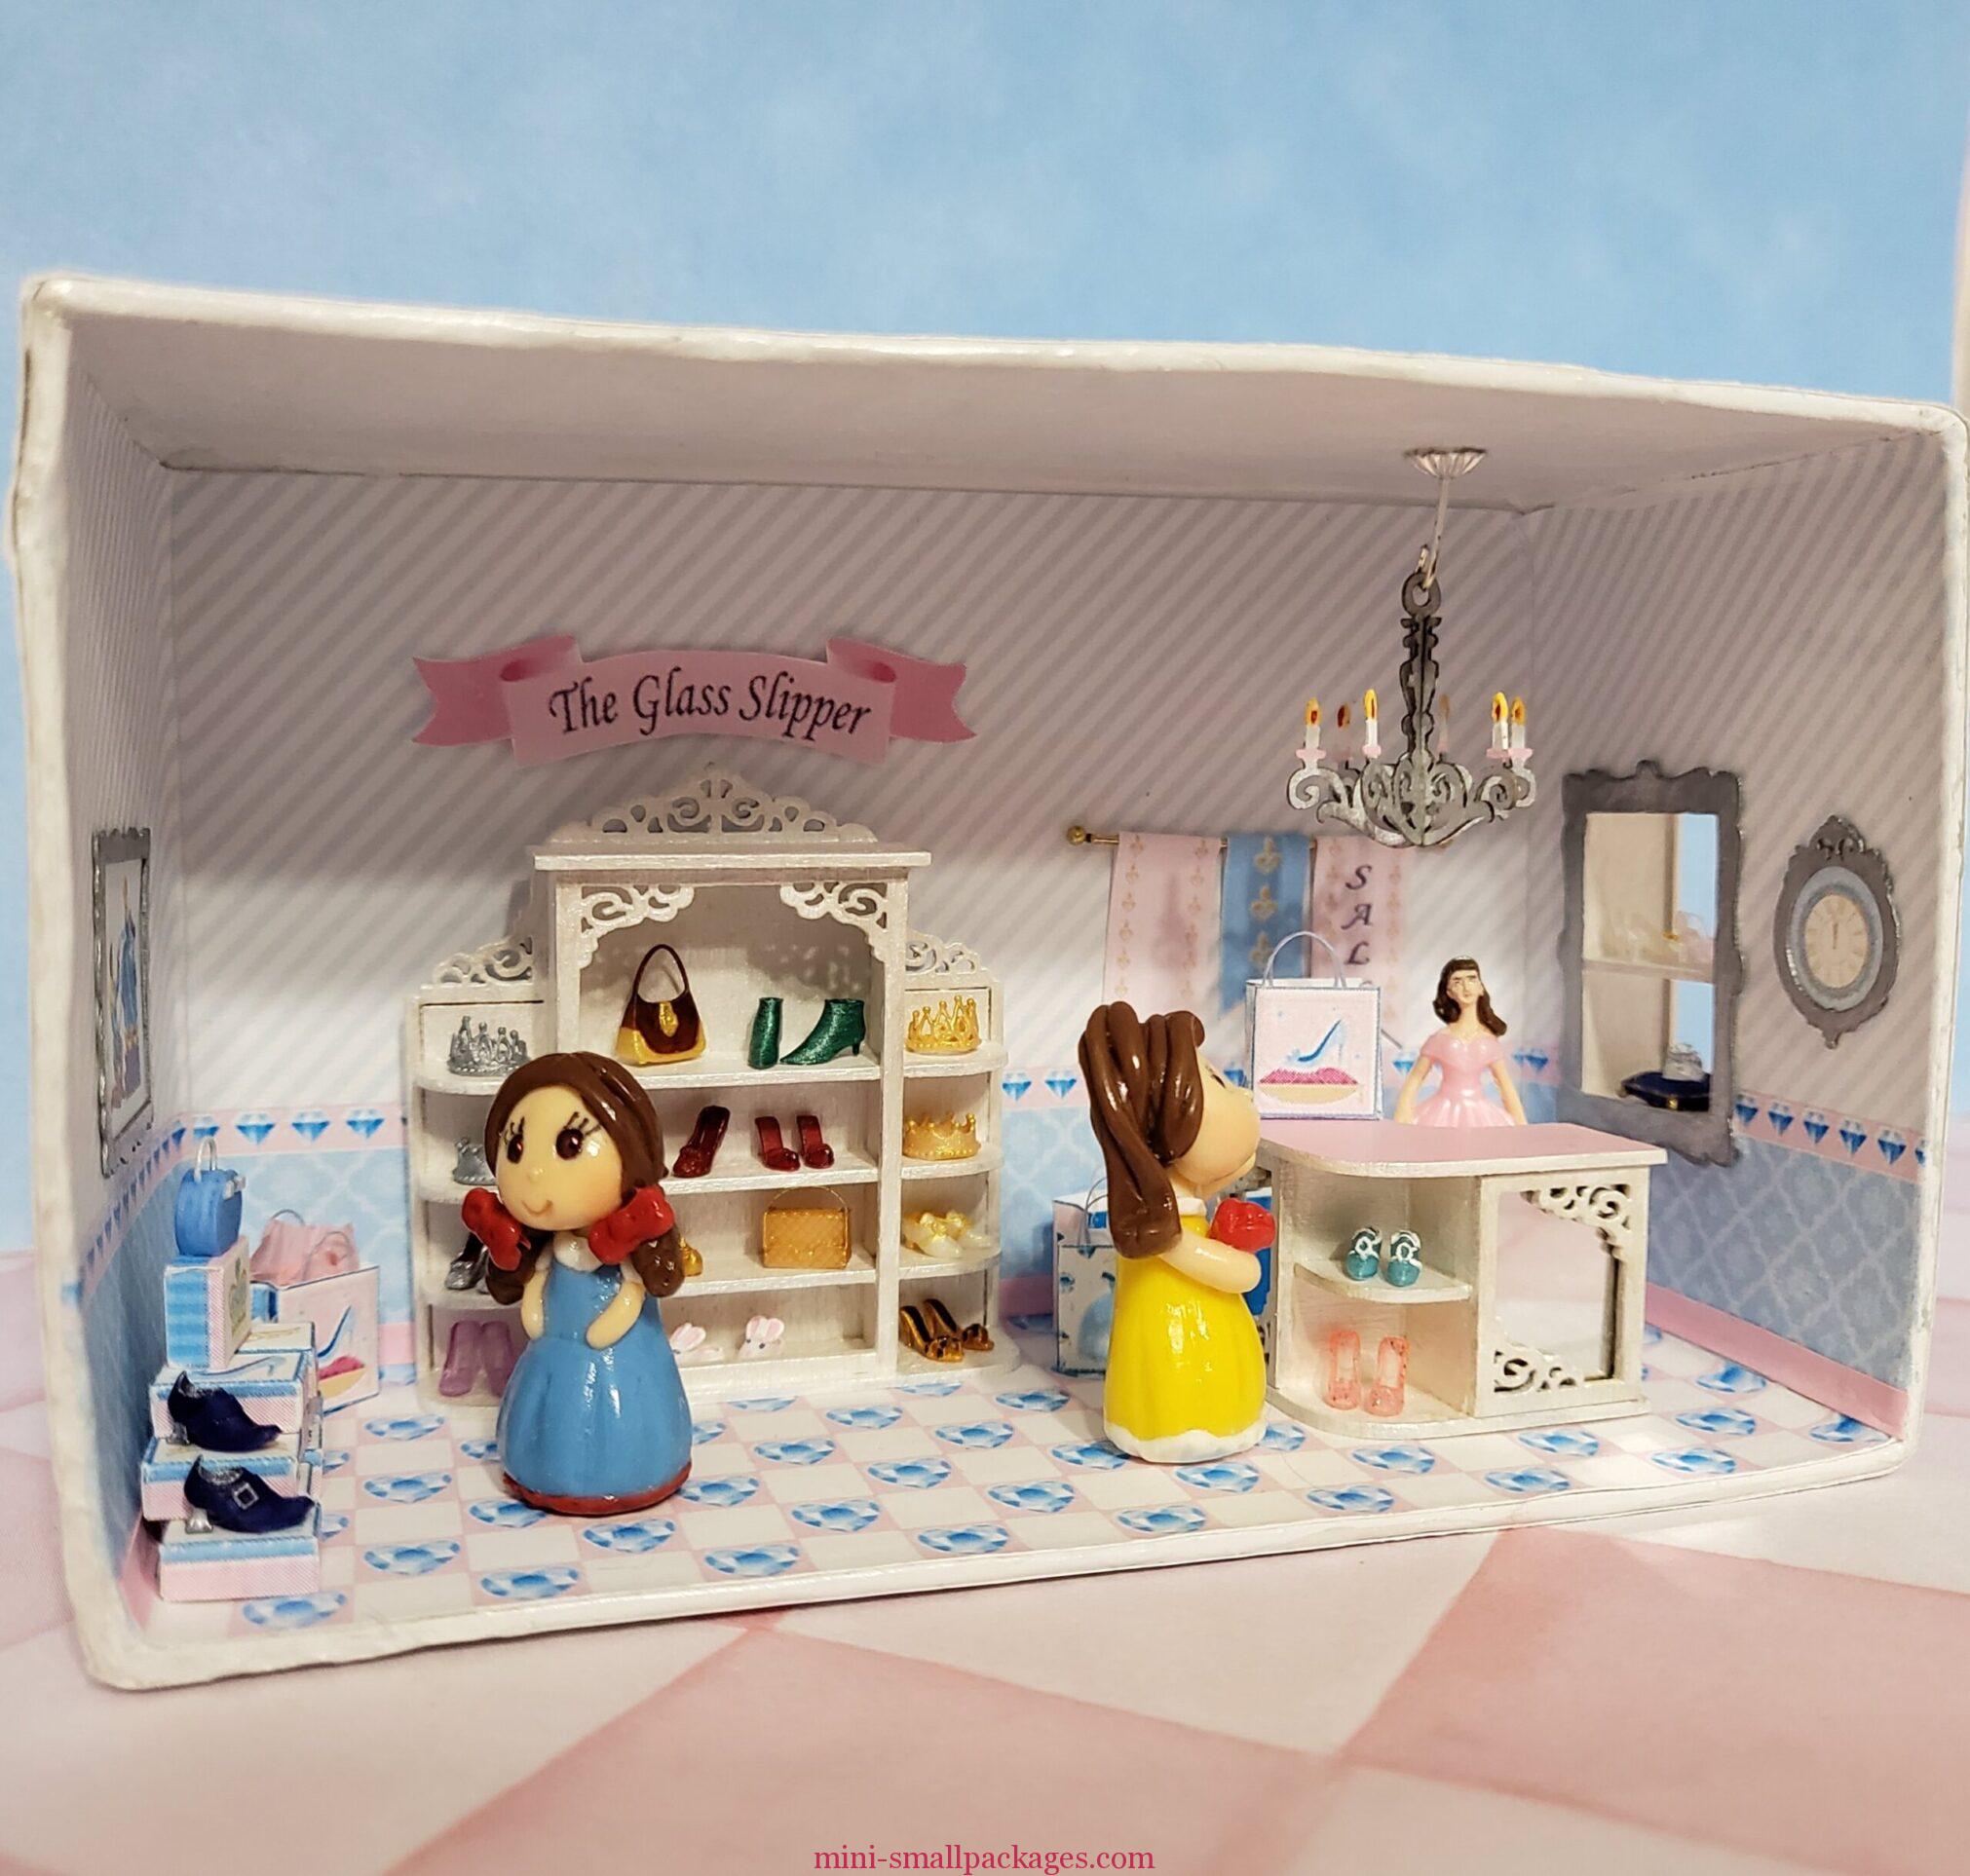
Other Characters
These two arrived as soon as the shop opened. Snow is wanting to try on some glass slippers and Belle wanted to know how much the boots are in the niche. Cindy has told her those are not for sale but some could be magically made for her. Belle and Snow were purchased from esty shop coldporcelainbypatty
Happy miniaturing!
Preble
If you enjoy my website, please consider making a small donation via PayPal.me/minismallpackages. Thank you!
I love the changes that you made!!! Incredible and as always i enjoyed your writing. The project came out wonderful.