Consider this a ‘what not to do’ or a supplement to the instructions included in the kit.
When I first saw this one in person, I was not excited. I don’t like orange. However I do love rabbits. On zoom there have been others working on these monthly projects so I can see or hear what others say about them. One person did not like the tree for this and made it without. I am torn. Do I stick to the kit as designed or not? I have changed kits before so I have the ability but do I want to take the time if there are modifications? Let’s find out.
Note: I write the way I work on a project. However this post has everything Exterior at the top and Interior after.
Exterior
We started with the exterior first. Nice way to change it up. But I immediately made a mistake. I forgot to follow the instructions. I had read through them completely before starting. Honestly, it was fine but I point it out because I’m trying to not do that. Reading the instructions through I tend to think ahead.
I used a brown alcohol marker for the house edges. I choose the best match I had to the print. The problem, I later wish I had used green. Did I mention my tendency to change things and dislike of orange? Well this is my first deviation on this one. However at the point I decided to change, it was too late. No worries, I didn’t mess up nor is it going to bother me sticking to the original plan.
Robin suggested sealing the artwork if you might get glue in the wrong places. I don’t seal as I rarely have an issue. But not this time. Here is what happens when you spread glue one time and lay the next side on the fresh glue.
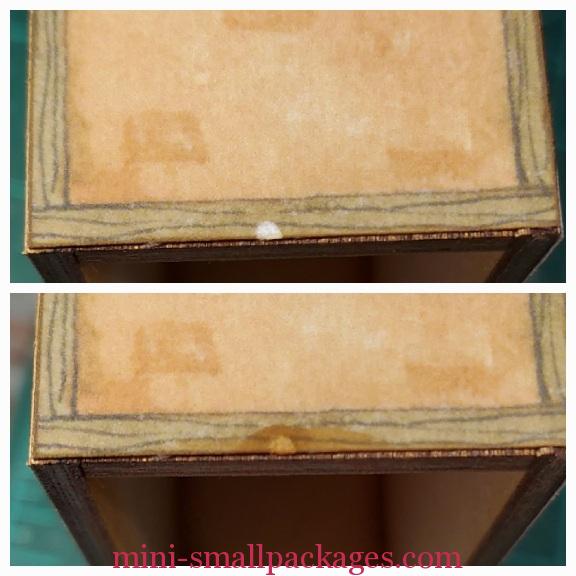
I added some color over the white to try and blend it. The color stands out more in the picture than in real life. I suppose I could add more brown like its a knot.
Roof and Shingles
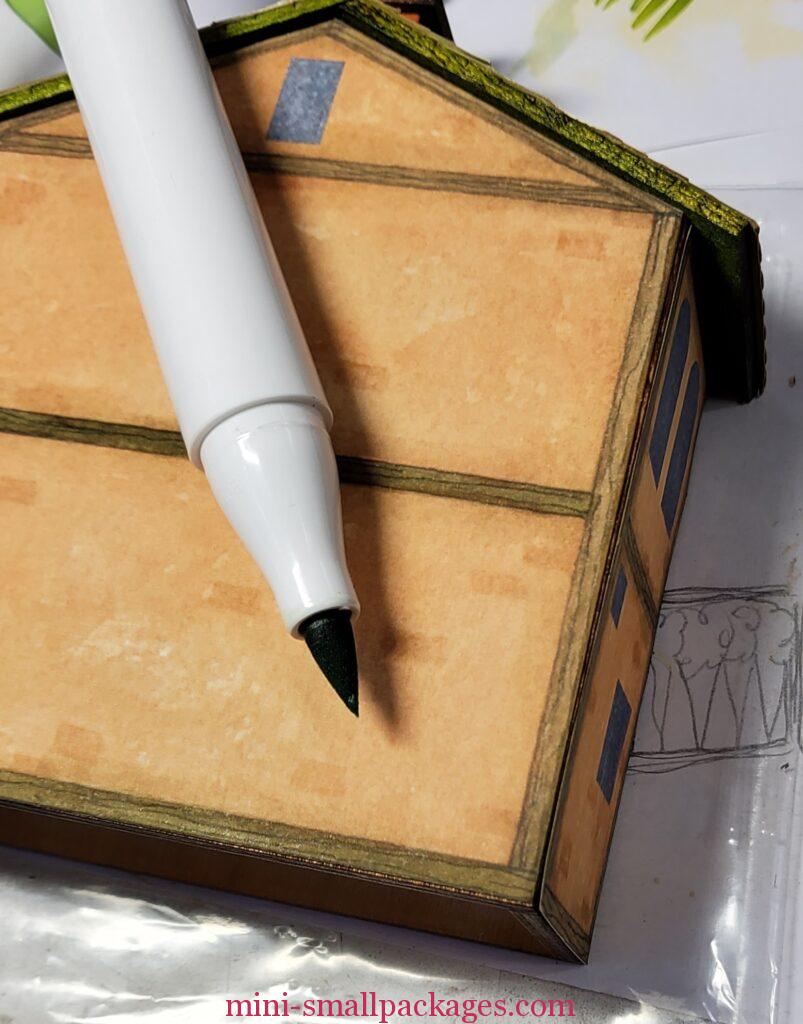
The color I used for roof edges was via an alcohol marker in olive green. Although on the wood it could be considered more spring green, especially after applying a satin gloss. I’m happy with the colors so far.
Shingles – I wanted to do both roof sides at the same time to avoid having the overhang problem I had with number 3. However I decided to line up all the strips to one side. Since the kit has the needed strips precut to fit with each other I don’t have to change the alignment myself back and forth. I just need to cut out from the sheet and use the correct row. It was super helpful to have the specific order of shingles to use already laser cut, but that doesn’t stop me from cutting the wrong ones from the sheet. I figured it out quickly and was able to remove them. I was using thin white glue for these paper shingles so gluing to the wood had more drying time.
Before I got too far on the shingles I put the wood pieces on the roof. (I am adding shingles way too soon by the instructions). I made sure to let part A dry before sanding. (That’s why we are supposed to wait to shingle).
I’m only telling on myself for skipping steps because I tried and didn’t like it. Don’t be tempted to do the roof before it is glued on.
How I mark the roof to sand.
Once the first roof side is on, I use a ruler to mark the angle on both sides. Then I look for my marks and draw across the roof itself. Then I use my Stylo+ dremel tool to sand away. This picture shows doing the same for the other roof piece.
Once sanding is done, I finished shingling. Now in step 7 Robin says she forgot about the chimney. I didn’t. I prefer cutting around after.
Because I wasn’t following the instructions totally I missed step 12. Looking at the short side, I can see where that might have helped if I had been paying attention.
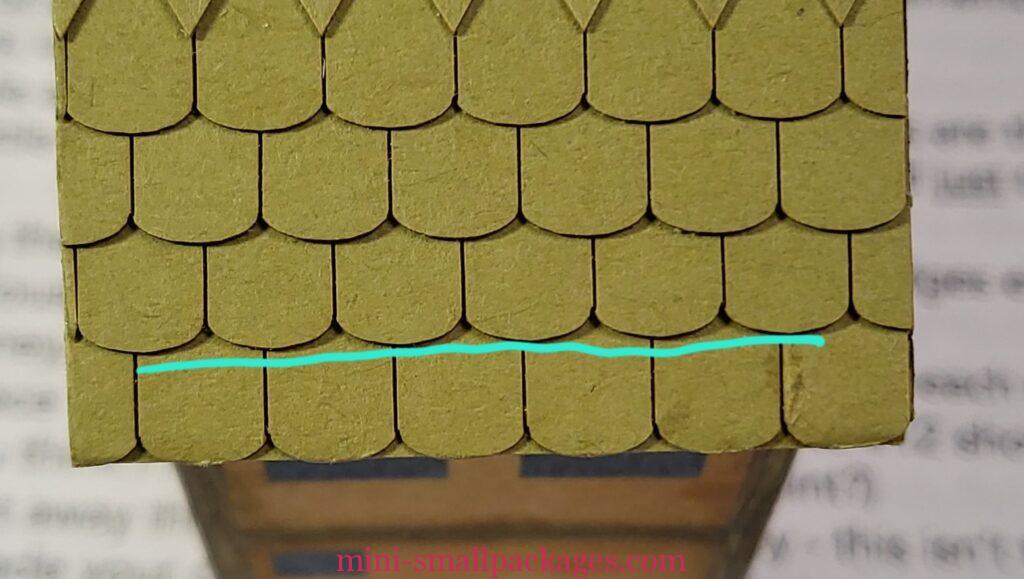
I really love the different shingle design.
Chimney
OK, this is some of that orange color. It’s Terra Cotta which isn’t as bad. I didn’t sand enough on the sides which I thought went towards the front. Then when I went to install I realized I’m turned around. The sanding is fine. Looks like a joined place.
Compare chimney sides and shingles cut away
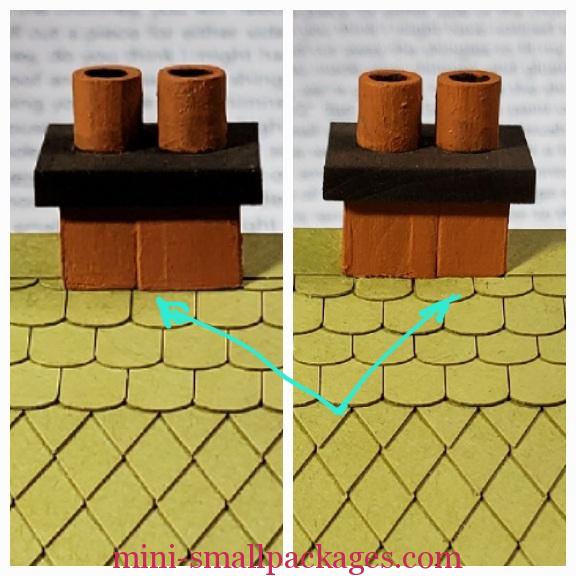
I added the chimney after shingling. To do so on this one was easier. I just use my craft knife to mark the side of the chimney block while holding it in place. Then I remove the chimney and cut away the part that was under it. I saved the shingles and trimmed those to fit and added them back. On the left in above pic, I did not add back. On the other side, I did.
Exterior windows
The instructions said to paint the windows for interior and exterior as Butter Cream. I wasn’t feeling this color for the exterior so I held off. Thinking I wanted to play off the green roof edges, I explored some colors using alcohol markers.
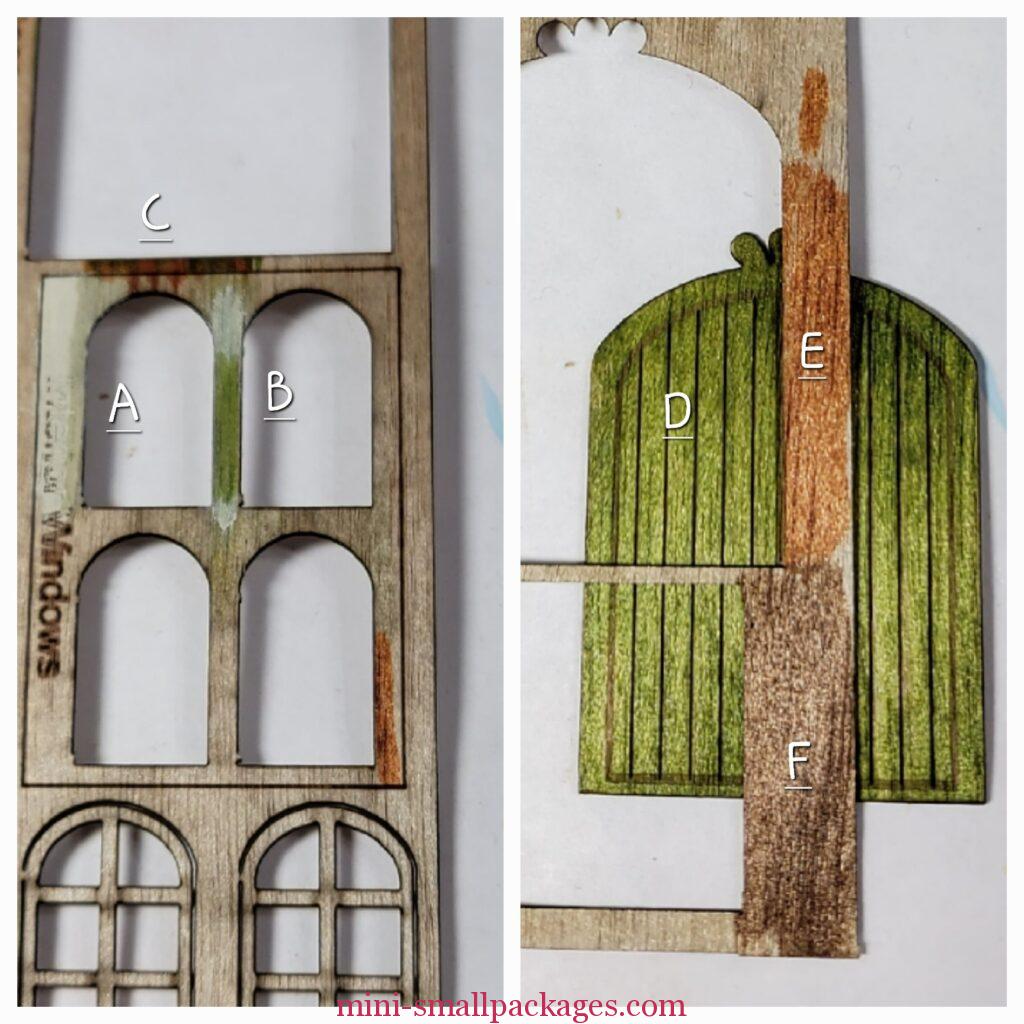
AM=alcohol marker, P=paint
A Grey Green (AM) with Butter Cream (P) over it. B Butter cream (P) with green over. C Potato brown (AM) Olive green (AM) mixed. D Olive green (AM) on wood. E Potato Brown (AM) on wood. F Raw Umber(AM) on wood.
Despite my dislike for orange, I’m liking this potato brown as it coordinates with the chimney. This is more a burnt orange which is more to my taste. I proceed to apply the potato brown, but when it was too much, I spritized with isopropyl alcohol and wiped or blotted the frame.
Here is initial results
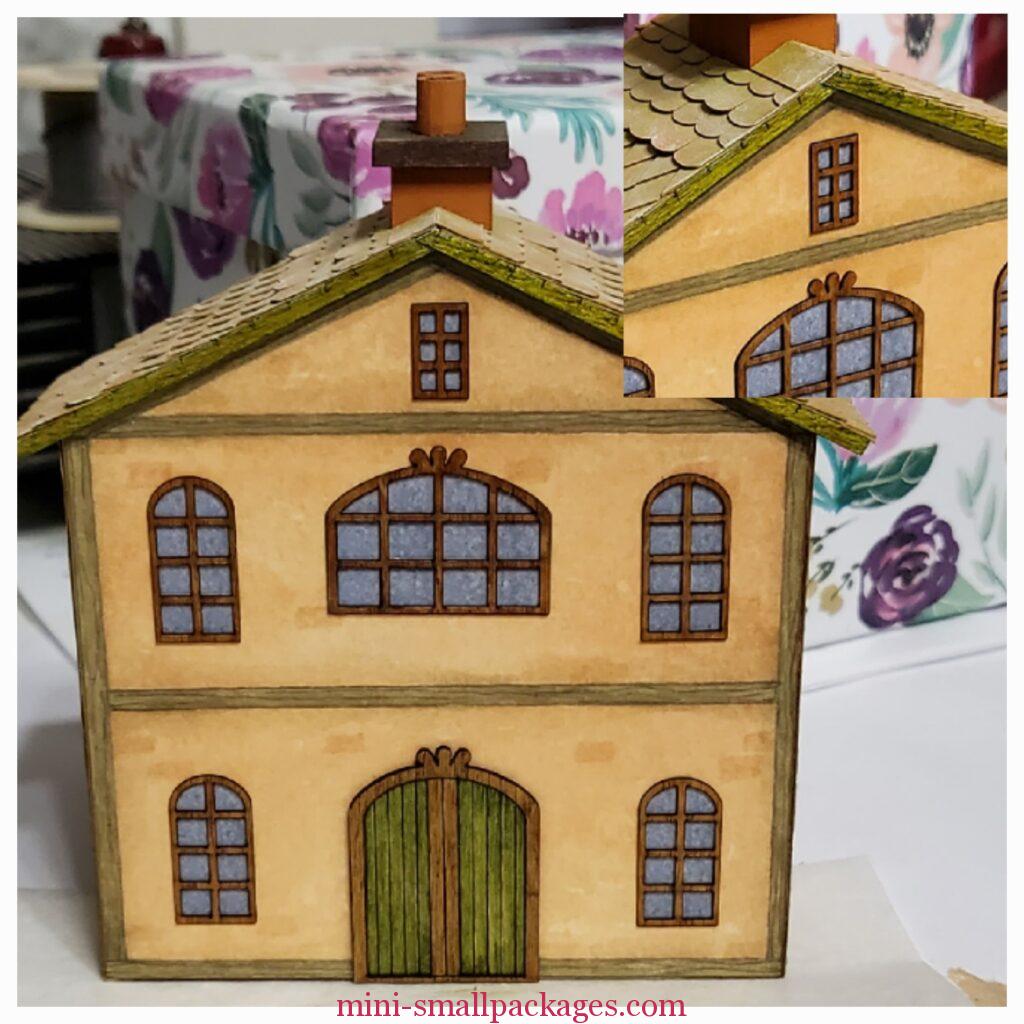
Not sure if it is noticeable, but I also changed the color of wood trim on the print. I used the Grey-Green I was trying on the wood trims.
In the picture the side trim and top trim on the print has not been colored. Be brave if you consider doing this. However always test in a less conspicuous place like under the eave of the side.
Exterior Finishing
What’s left is the accents or accessories for the outside.
I started this part by adding the suggested wreaths but used rabbits instead. The greenery is from the paper leaves that I cut extra slits to form more leaves.
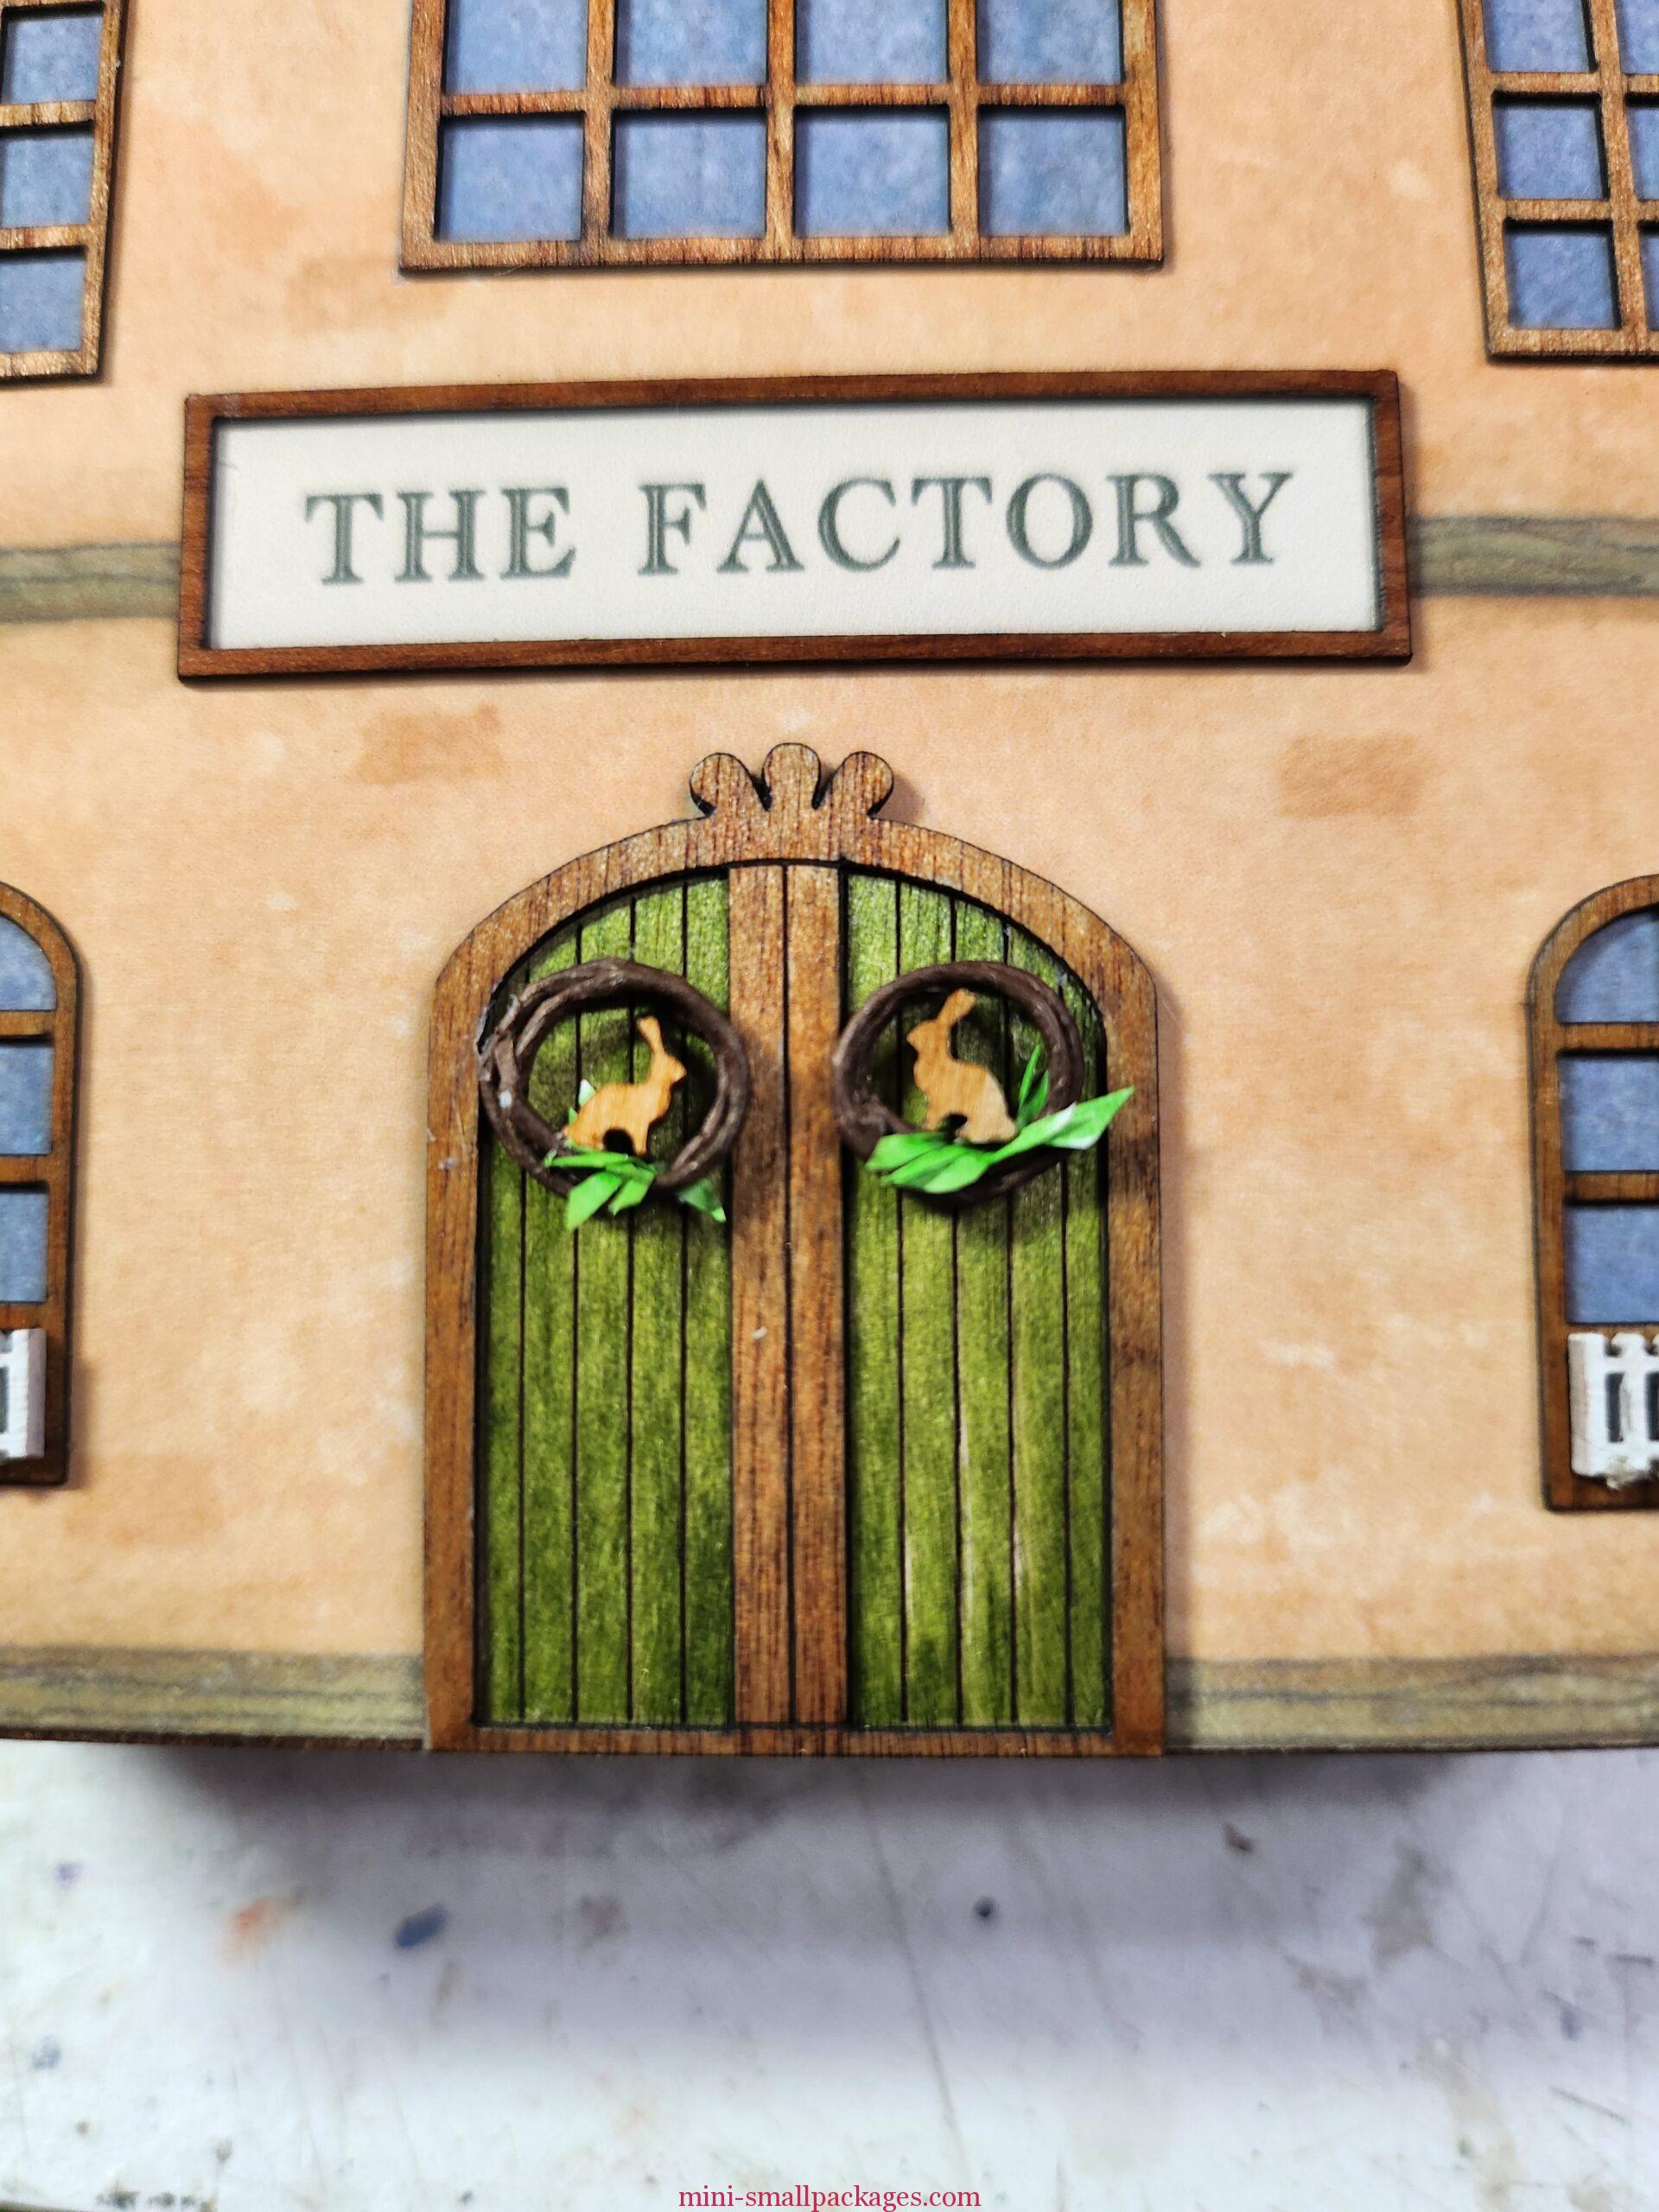
I debated whether to add anything extra to the sign and for now I’m happy. I might add more later.
I wasn’t feeling the paint and brush flowers designed for the kit, so I decided to add the little picket fence on the first floor windows. I might have used more if I had them but I don’t.
The little picket fence I then added the chicks.

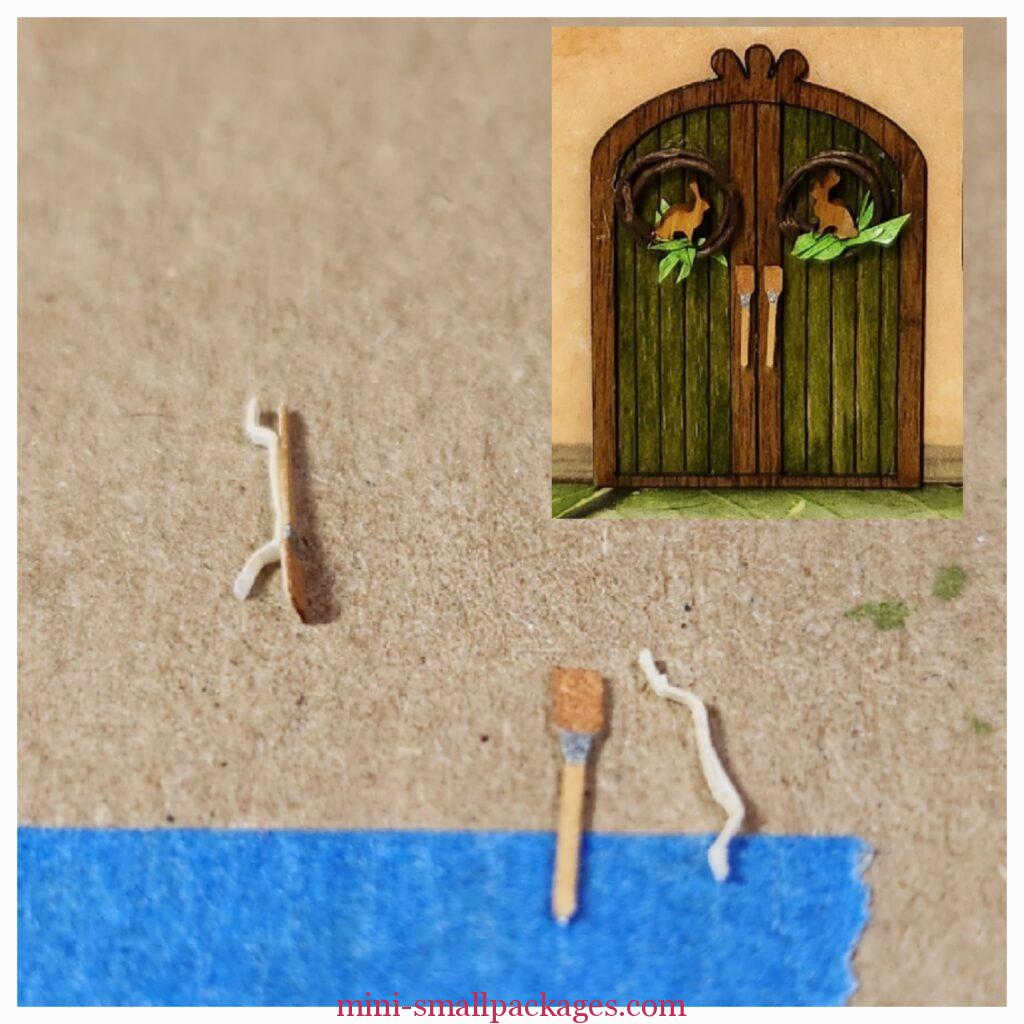
Door handles
We were supposed to bend a paintbrush as a handle and I chose to bend a scrap piece and glue it under the paintbrush.
Interior
Wallpaper – Be sure to paint the edges of the walls. My side wallpaper was too narrow in several places. I am very careful to not cut too much but maybe I trimmed it too close. It turned out fine.
Cabinets
These are pretty neat and would be nice to have in real life.
My mistake with these was putting on the drawer fronts.
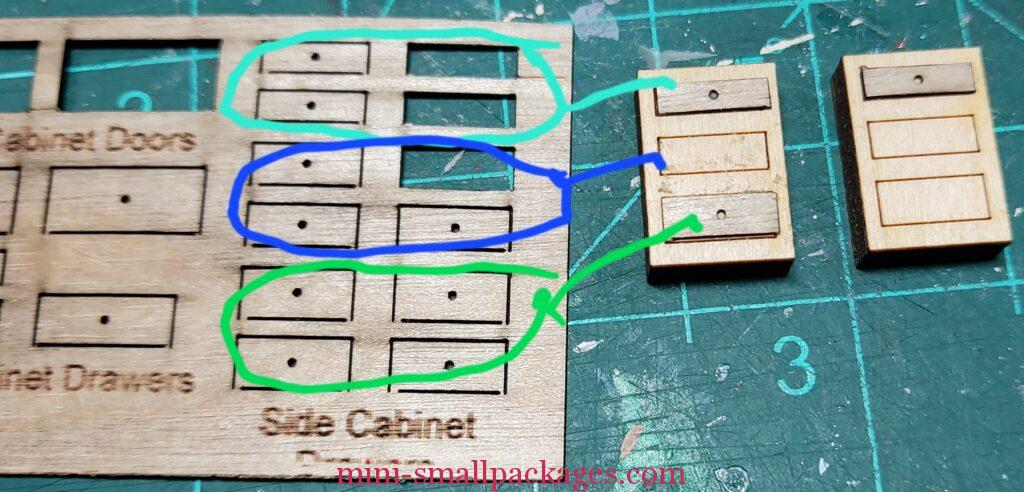
My mistake was thinking the four I removed were a set for one cabinet. My first clue should have been that the fronts seemed too small but it was only applying the top one I realized they really were supposed to match size. Duh! Thankfully they were easy to pry off. Then I was able to use them properly. I circled them to indicate which are the same. Lighter blue for the top, middle section in bright blue are for the middle and the green is for the bottom. On a different day, I probably would have understood but that day I didn’t.
Cabinet knobs
The ones provided are bronze and I just couldn’t use them. I pulled out my supplies and found a different color.
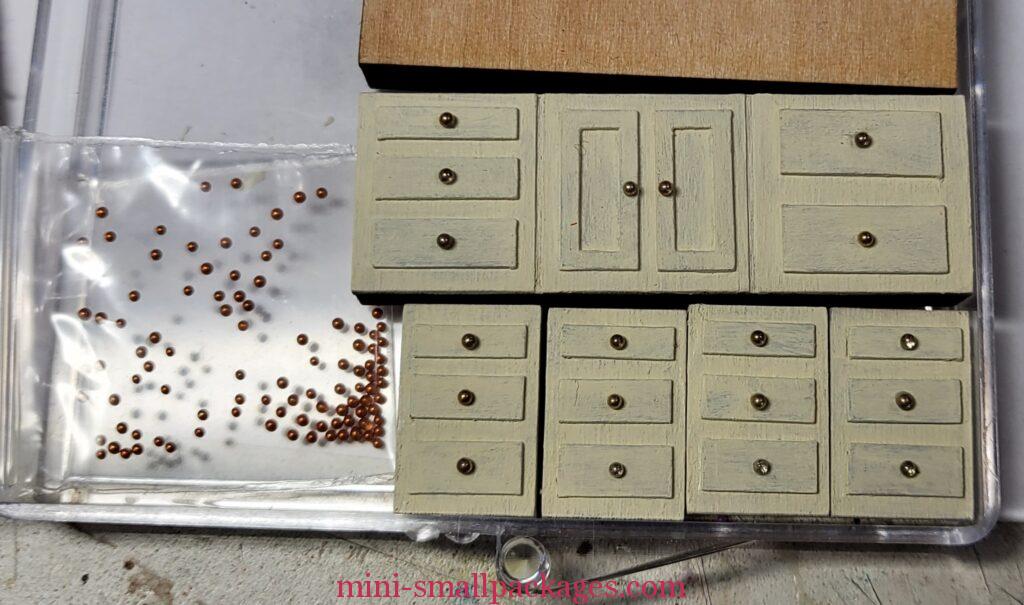
I tried diligently to try to cover the wood color. I am sealing them first but it is not working. Fortunately it is not showing in different lighting.
Lower cabinets are glued in and the instructions say to paint the windows. Paint all the windows at once. I didn’t because the interior ones was enough and I have other plans for the front.
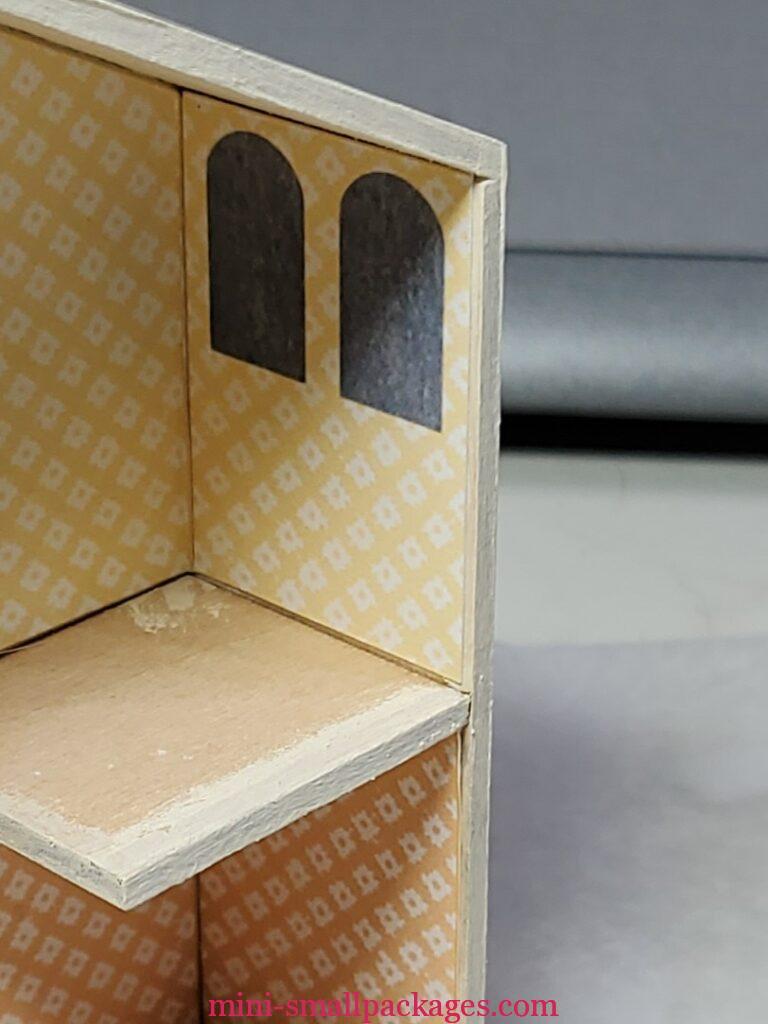
I glued both the square windows in place on the left. Then per the instructions I added the shelf above. Apparently I was too early for the small window. However when I did install it was very tight.
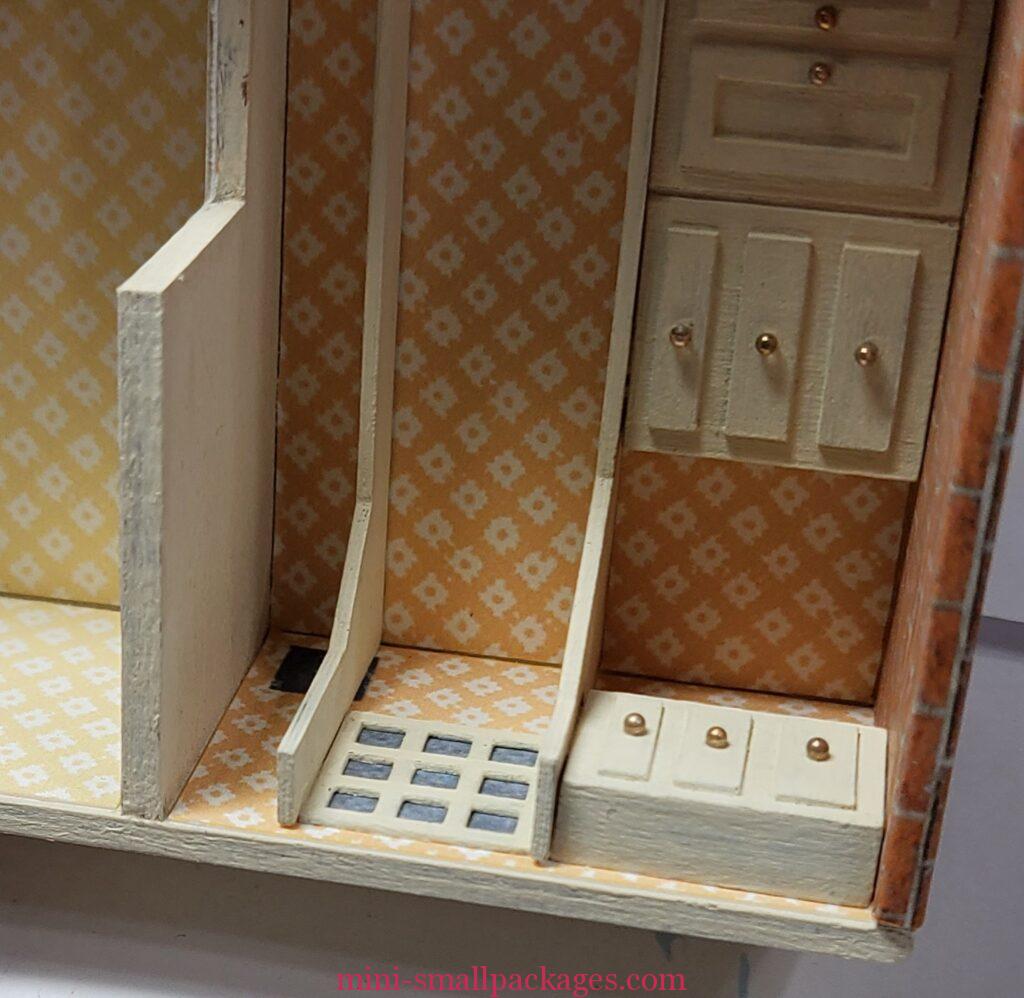
I had a time getting the shelf glued in place. I think would have helped if the brackets were available. I had not painted those yet per the instructions. I suggest painting them at the same time as the interior windows. Then they are ready when adding the shelves.
Upper cabinet
I did a poor job on the fabric over the main cabinet. I didn’t trim at the top before I glued in place so I had to peel it back out and trim. Thankfully the glue I used didn’t dry yet so it didn’t tear the paper. It is still too long.
Counter for Upper floor
I got ahead of the instructions and had glued in the second floor windows. Yet another mistake. The counter was a tad short which might have been fine. But since the windows were in, I had a problem.
A & B shows counter would fit, except for the windows added too soon. C & D show the cut outs I added. Alternatively I could have just sanded the ends until it fit.
Accessories
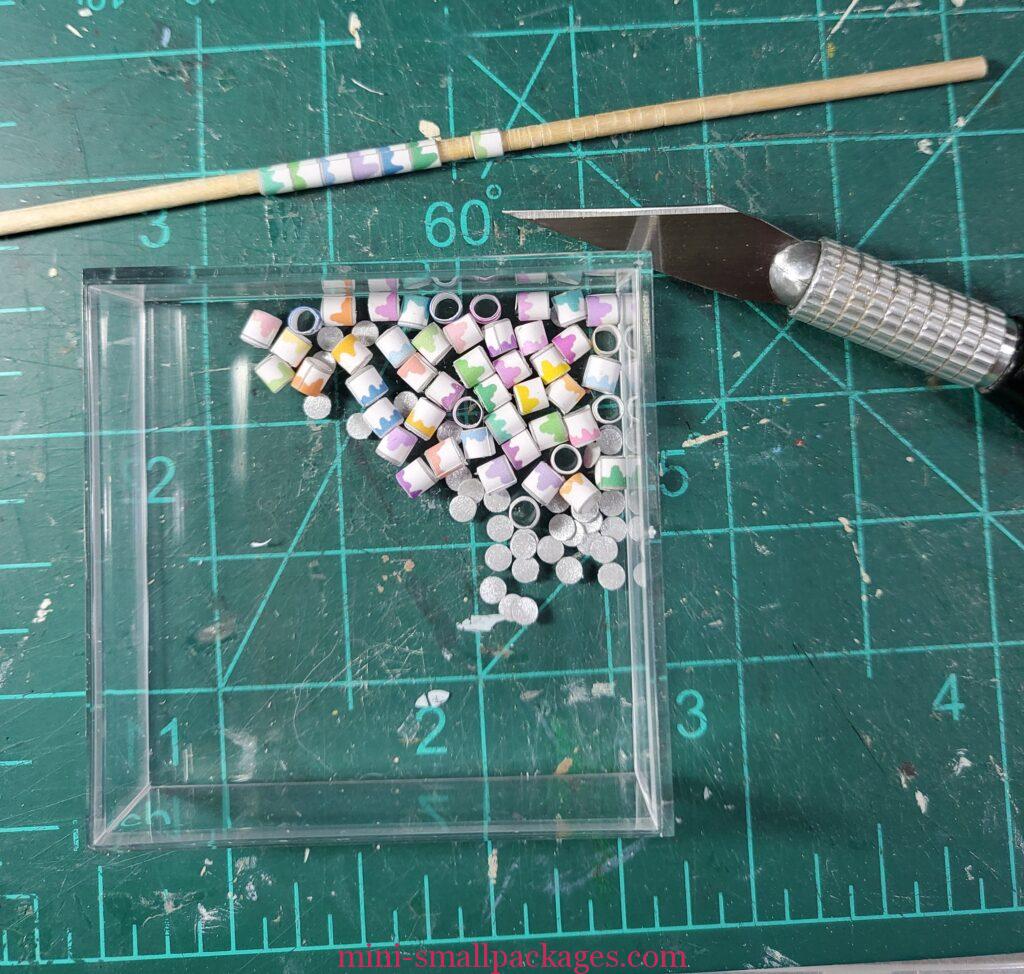
I started with the paint cans. I liked these and didn’t have any problems. Just making lots of them is boring. Follow the instructions and have some patience. It works great.
Next I made the baskets. I couldn’t do orange. This color isn’t much better. I used my alcohol markers for changes. Thankfully they don’t really show.
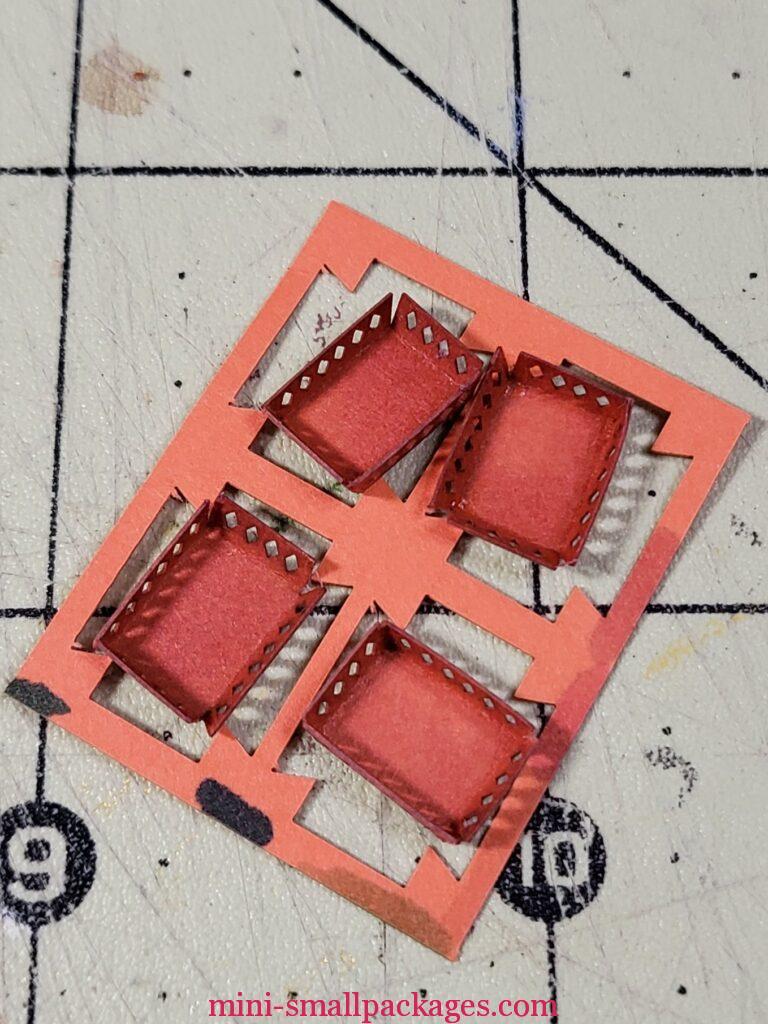
You can see I tried several colors of Alcohol marker on the edges of the basket motherboard.
Next was adding the rabbits, chicks and eggs to the baskets. I do add the instructions to them later.
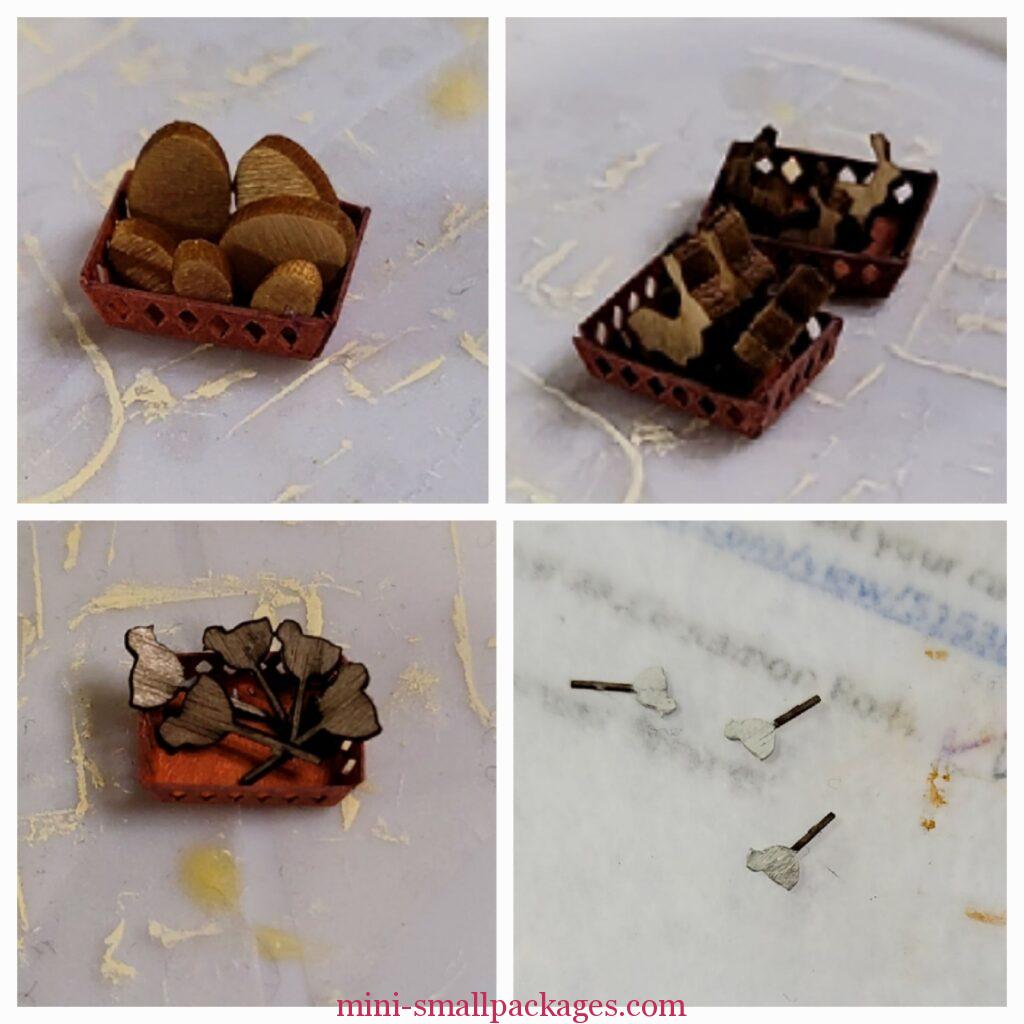
These show the baskets and the extra chicks I based paint with white before painting yellow and brown. I also painted the eggs in several colors and different ways. Some of the eggs have laser cut designs.
Then I did the chairs. I searched online for images in order to paint the designs. I couldn’t resist adding color and design to these wonderful chairs. I wanted to emphasize their design but maybe not worth the effort since they aren’t turned just for seeing the design.
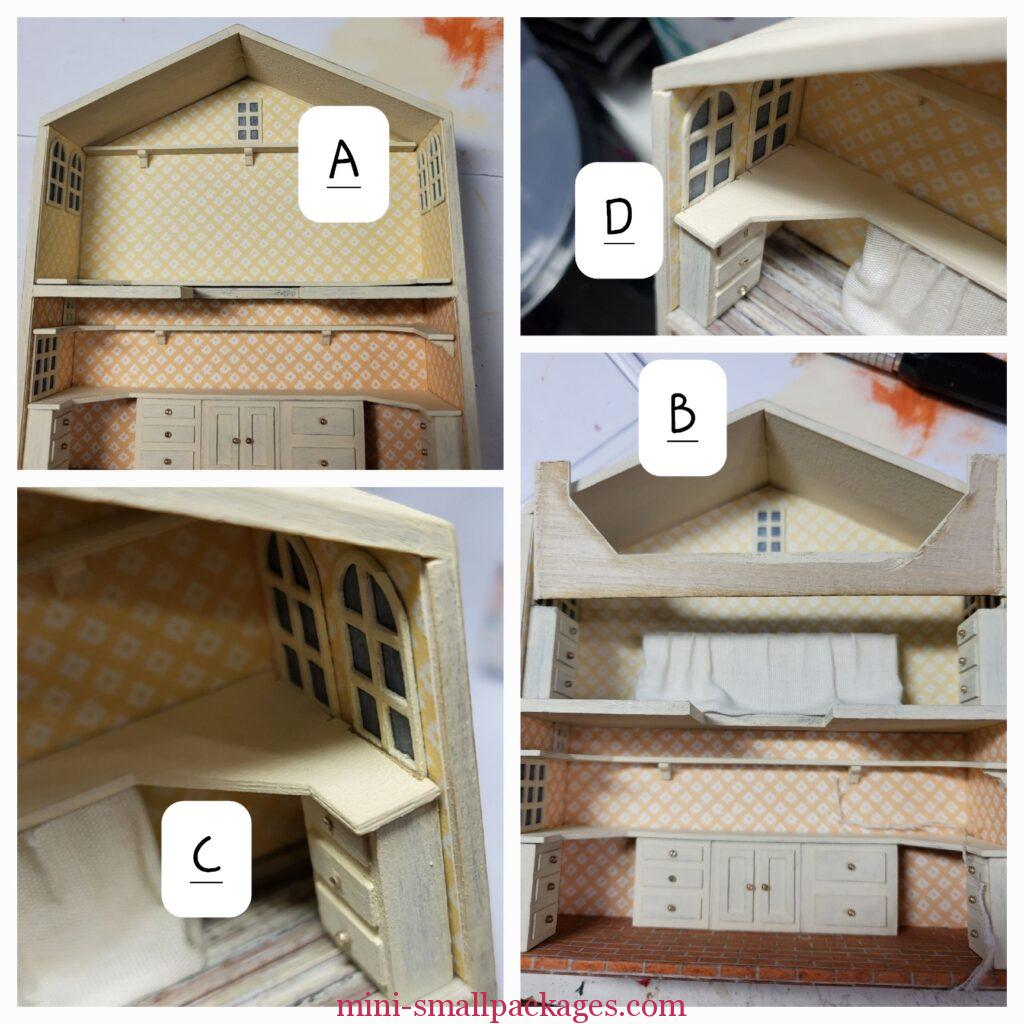
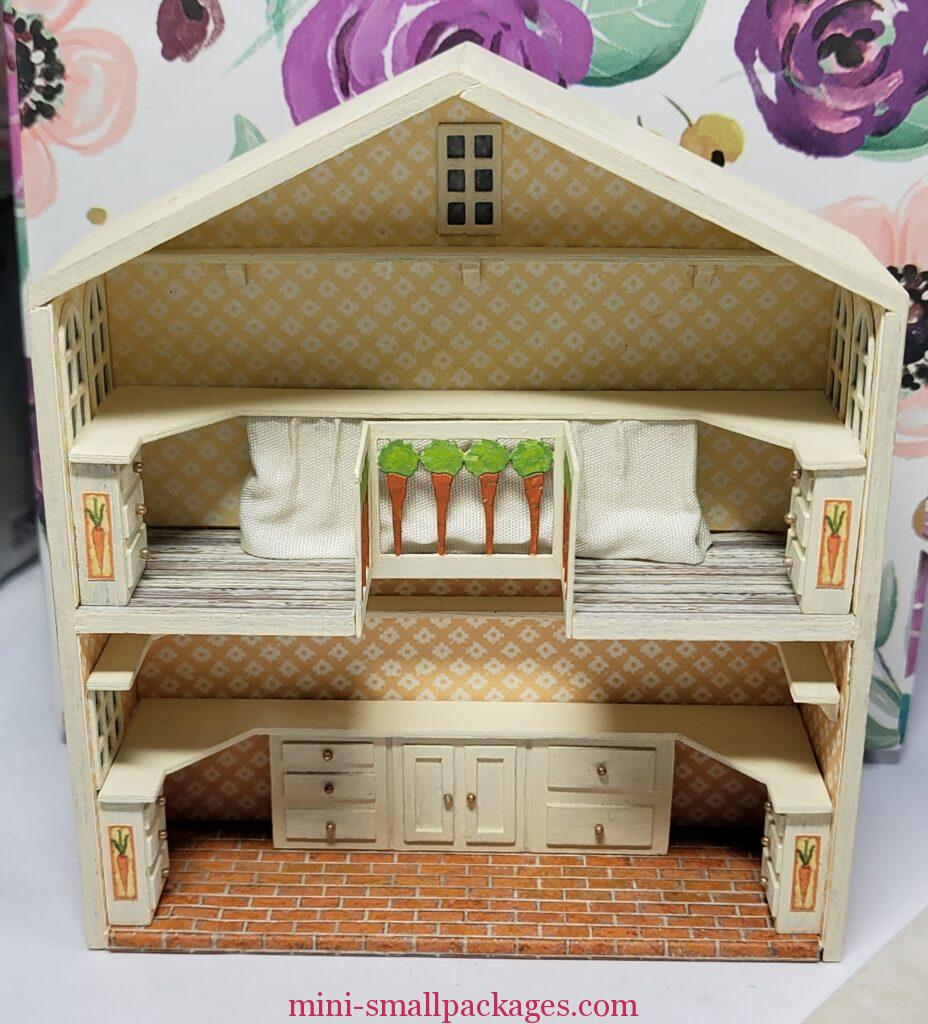
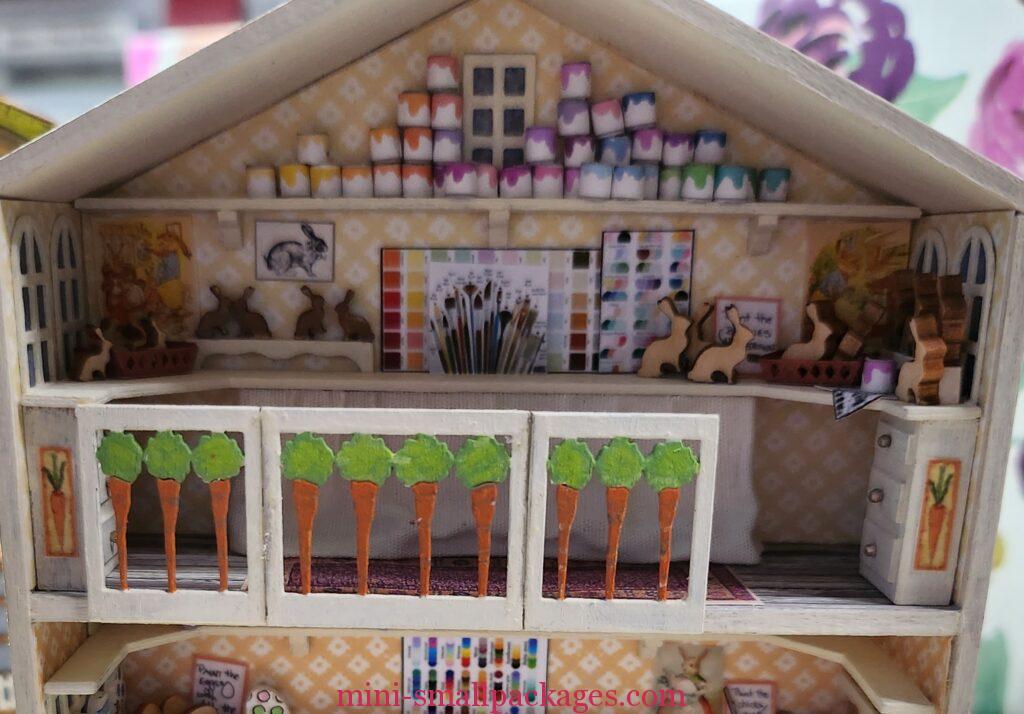
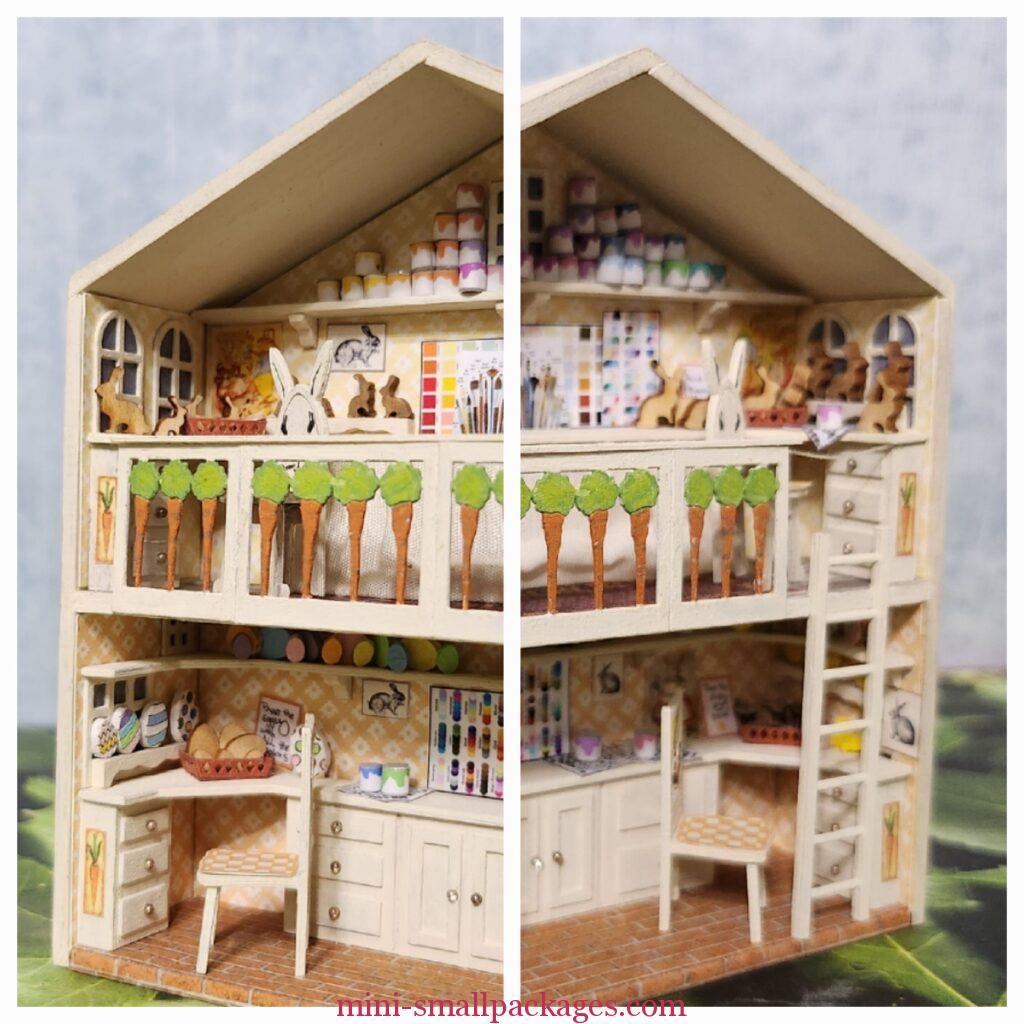
Second floor Change
I had some time to think about this opening. I wasn’t sold on the tree inside and had not attempted to make it. I didn’t like the spacing. I was ok with the concept.
Another person had closed in the opening and I decided that it what I would do. I carefully pried the lovely carrot railing from the floor. I sanded to remove excess glue from the railing panels.

I pulled out the wood motherboard the second floor came from and using my craft knife cut away the part that was “missing”. Cutting was super easy because it was with the grain of the wood. I used superglue gel to glue this in place and immediately regretted it. Although it was not an actual problem since I was able to move it around and didn’t glue my fingers to the floor. I think it was because of the leftover wood glue I could move it.
I let it dry and then used my craft knife to clear up any excess glue. There was very little.
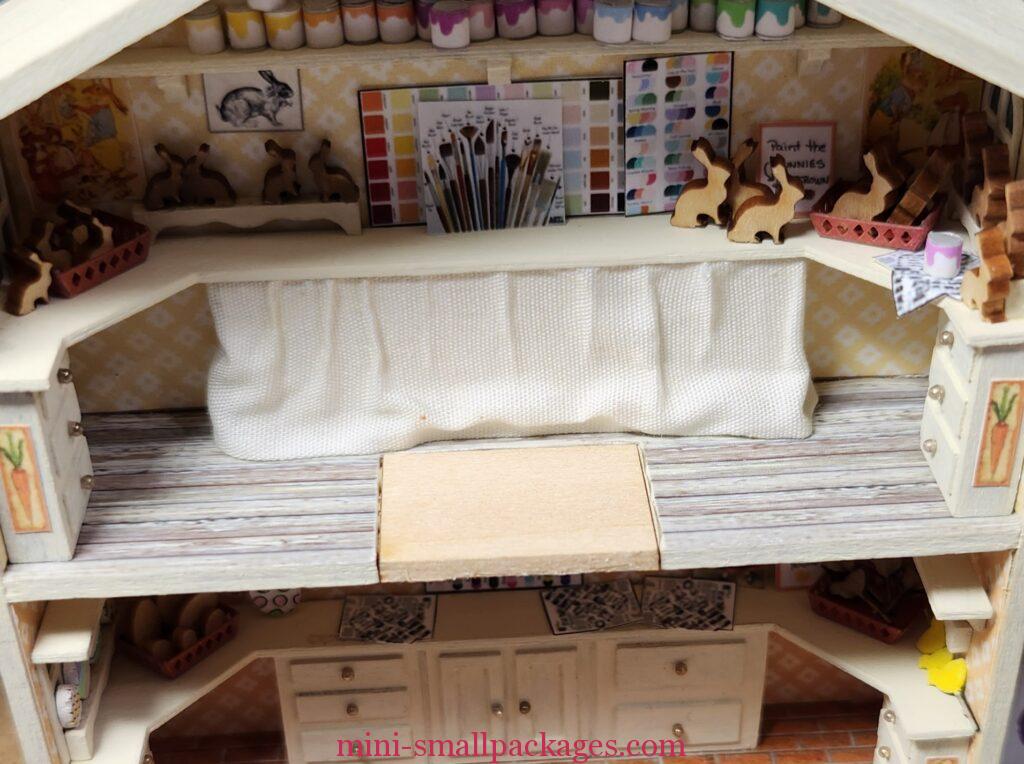
Next I checked my stash for a rug. I found a paper one. I didn’t bother with a bunny themed one which I could have made. I figured it would be hard to see. I’m glad I went with my stash because that’s one from my swaps getting used.
I started gluing the wide railing piece in the middle but then decided to move them around. I decided on having them all three together to one side. I will add a chain or rope on the opening.
Notice I didn’t mention paint yet for this floor change. I only painted the floor underneath. After glue had a chance to dry on the railing panels, I painted the spots that were sanded to remove the glue.
I was considering a ladder. Checked my stash and there was enough of one. It’s an industrial style which works perfectly for the factory.
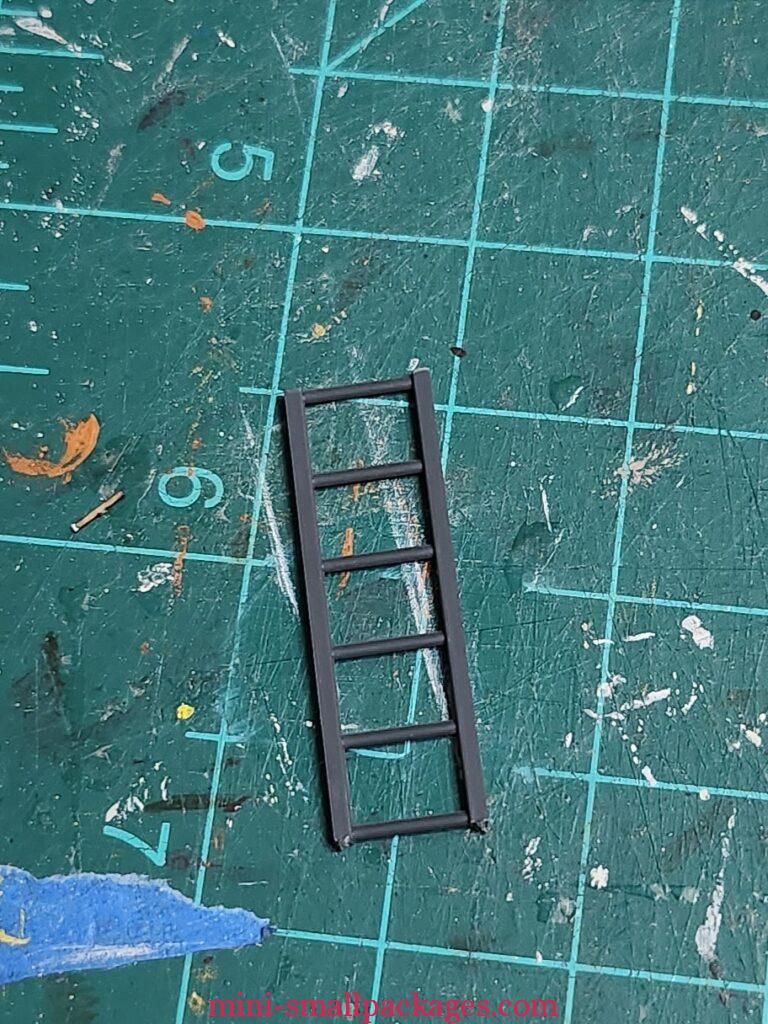
To make sure the ladder didn’t stick out when sliding the exterior over, I notched the floor.
Trimmed the ladder to the right height and painted it. Glued it in place.
The chairs were glued in last.
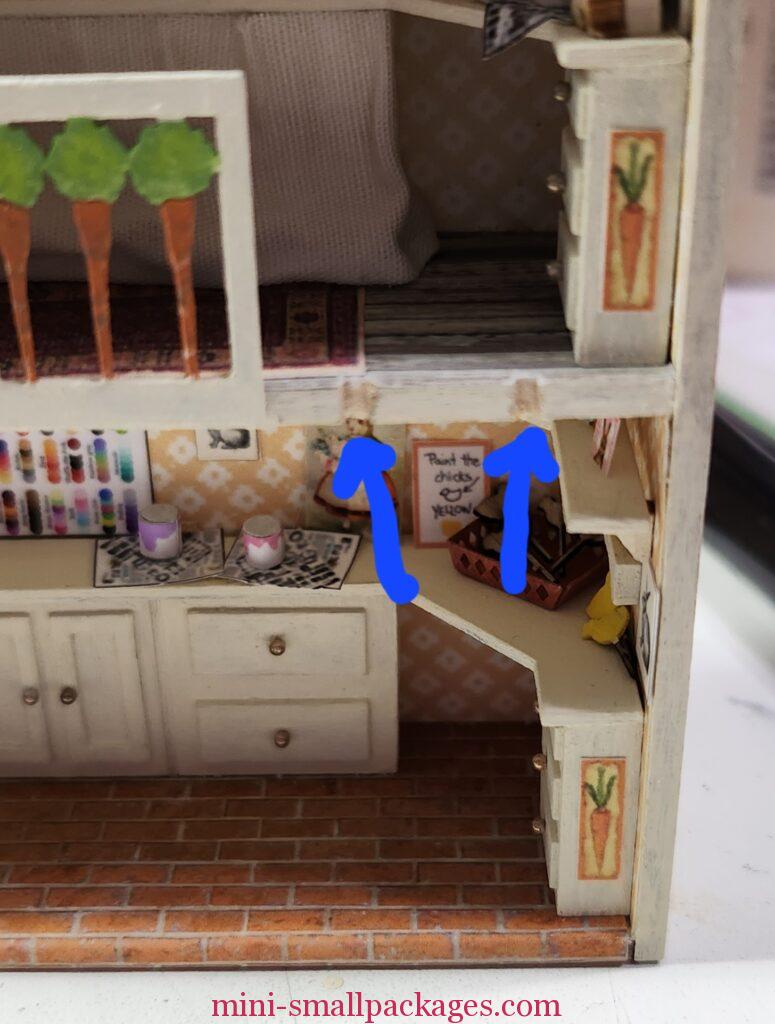
But wait… I forgot the balcony railing and the chain/rope. To do the railing, I pulled out lumber I keep in my stash. Mine is mostly from Midwest Products Scale Lumber. I cut it to length, glue in place and then once glue has dried, I painted to match.
The chain/rope was more frustrating. First I looked for chain. I couldn’t find it. Then I was like, I’ll just use embroidery floss. Couldn’t find that either, but I may have given to my daughter to sell. Lastly it was suggested to me to use sewing thread and that is what I settled on.
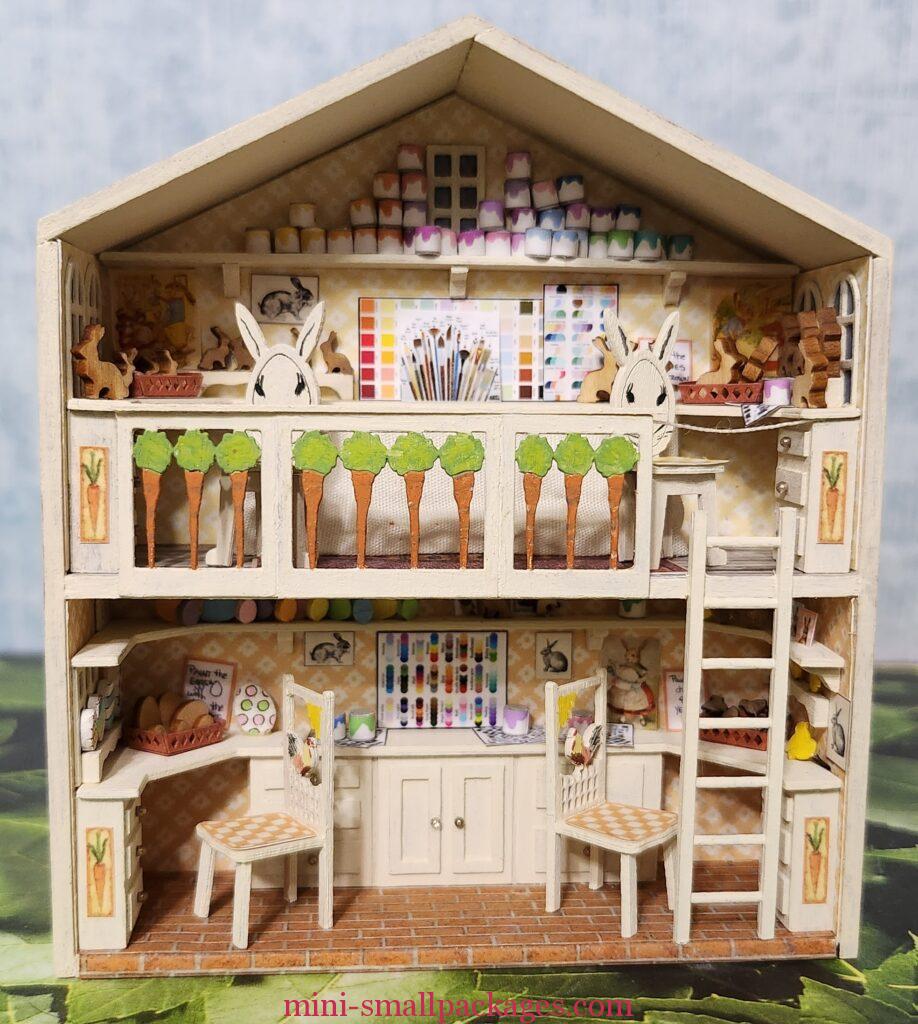
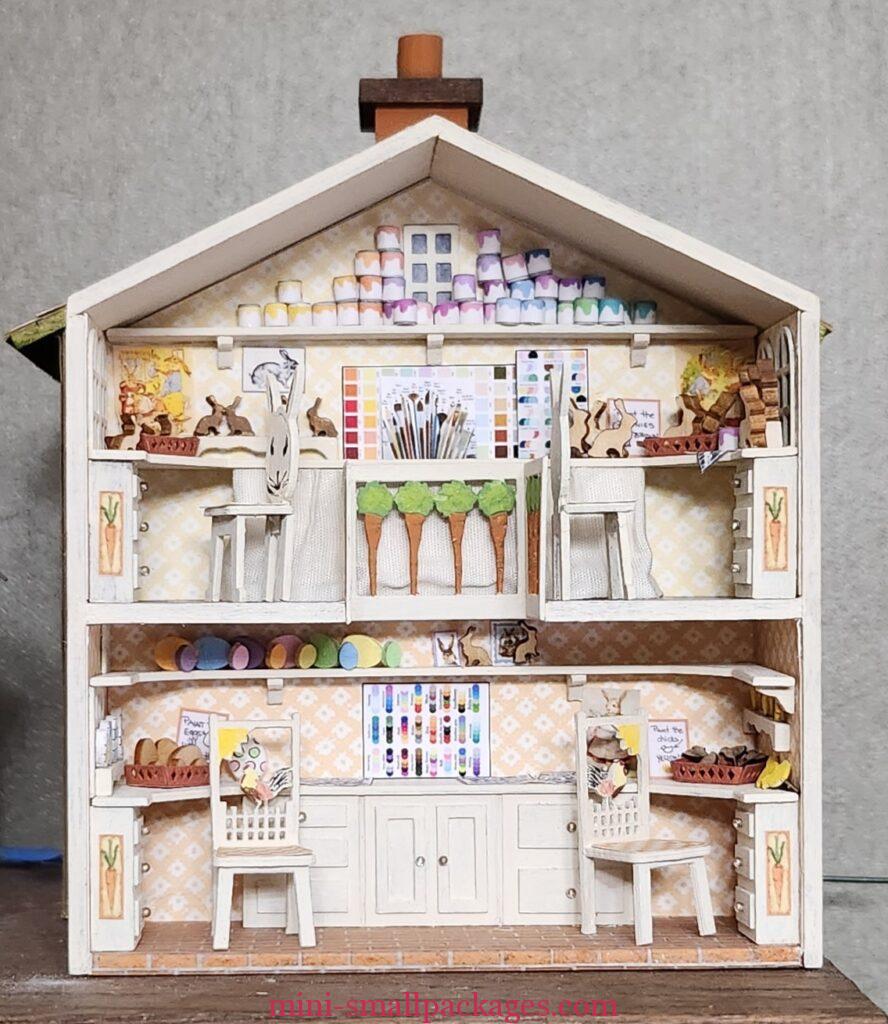
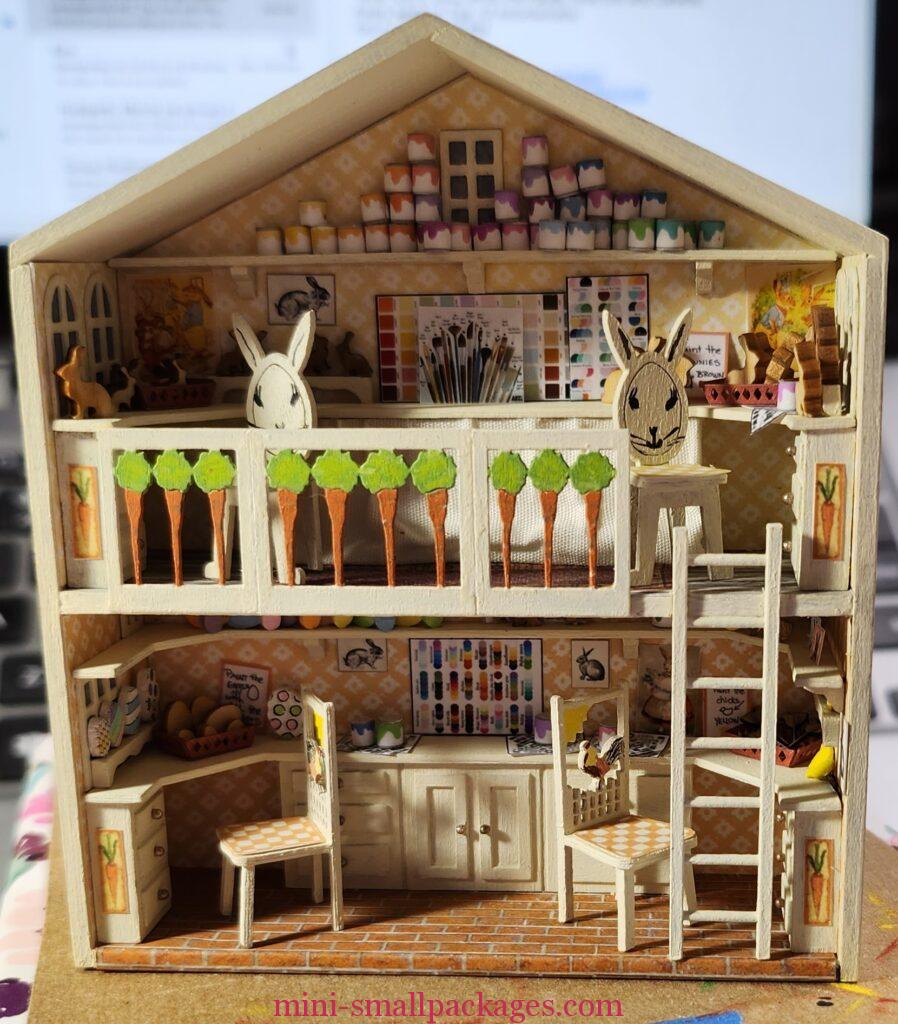
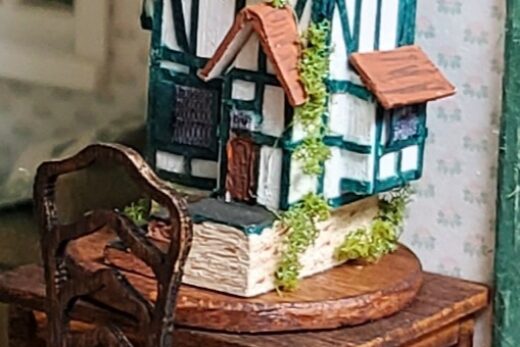
Here is my finished number 4.
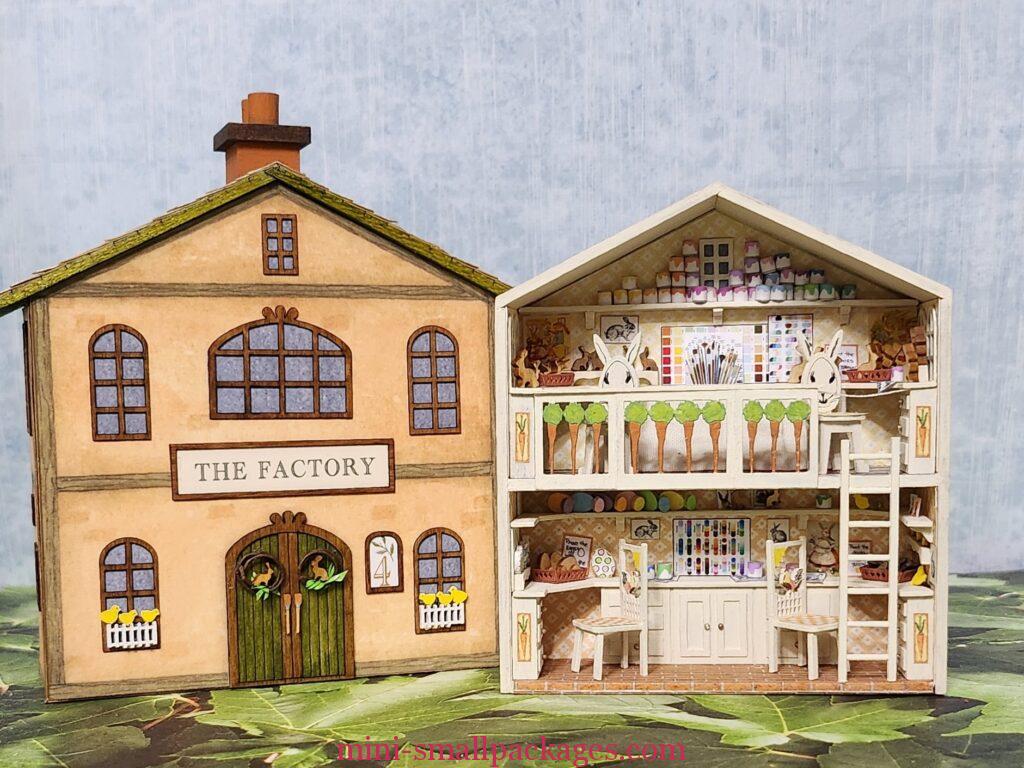
The 4 together

Happy miniaturing!
Preble
If you enjoy my website, please consider making a small donation via PayPal.me/minismallpackages. Thank you!
It’s always so much fun seeing what miniaturists do to make a kit their own. Love the changes you made and thank you for sharing your build and tips.
It looks great Preble. I love how you make them yours.